How to dry celery root
Product preparation
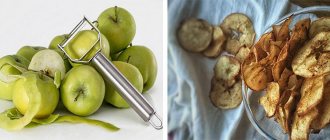
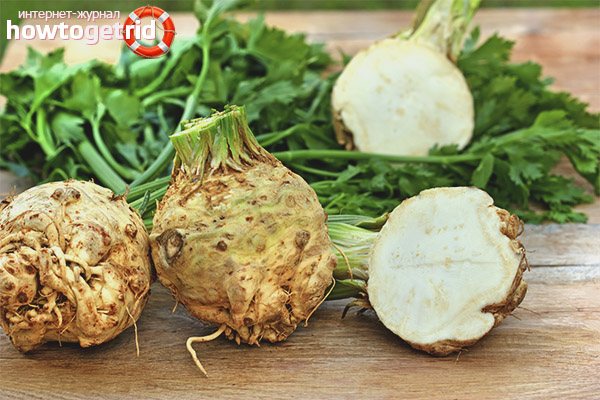
Root crops for drying should be dense, light-colored, without damage or rot. The roots are thoroughly cleaned of soil residues and washed in running water.
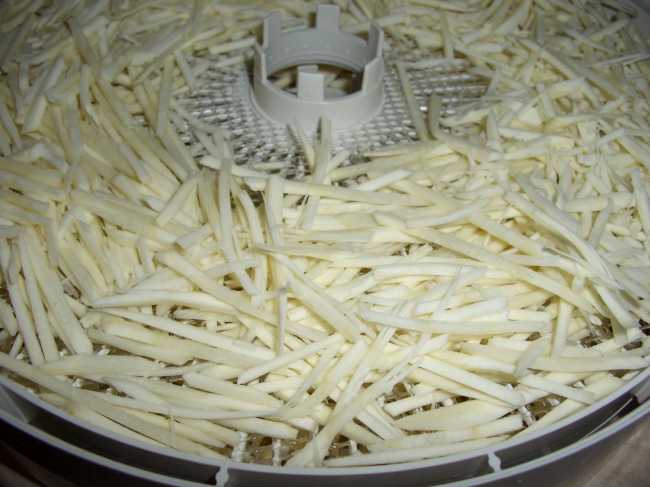
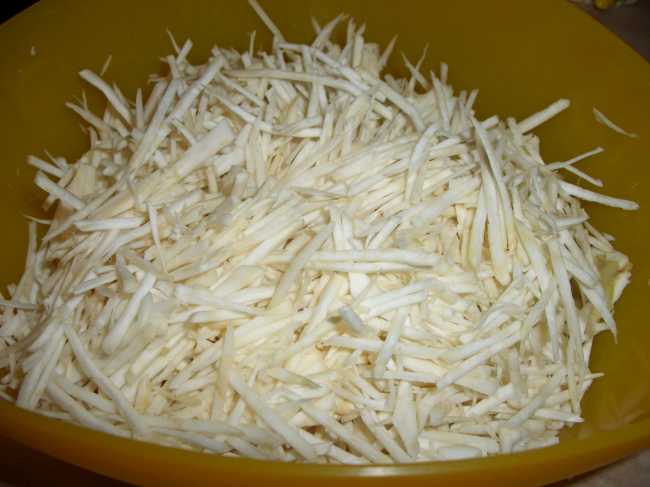
To remove the thick skin, you will need a sharp knife or vegetable peeler. Peeled root vegetables should be chopped. This can be done in several ways:
- chop the root using a coarse grater;
- cut into thin long strips using a knife or a special grater for Korean salads;
- chop the celery into thin slices using a vegetable peeler;
- cut the vegetable with a knife into rings no more than 5 millimeters thick.

Drying time using any of the methods below will depend on the method of grinding the product.
Drying methods
Celery root can be dried using the following methods:
- On air. The crushed root is placed on baking sheets, sieves or grates in a thin layer. The containers are placed in a dry and well-ventilated area. It is better not to expose the vegetable to direct sunlight. The cuttings need to be stirred periodically. Drying time – 14 – 20 days.
- In the oven. Line baking sheets with parchment and place celery on them. Drying should be carried out in an oven preheated to a temperature of 50 - 60 degrees, with the door slightly open.
- In an electric dryer. The temperature on the device is set within 50 degrees. The racks with celery are swapped every 1.5 hours to ensure uniform drying. Drying time – 10 hours.
A video from the Ezidri Master channel will show how to properly dry celery and parsley roots in an electric dryer
How to dry leaf celery
Product preparation
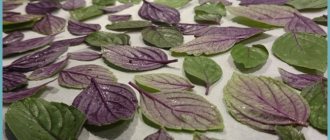
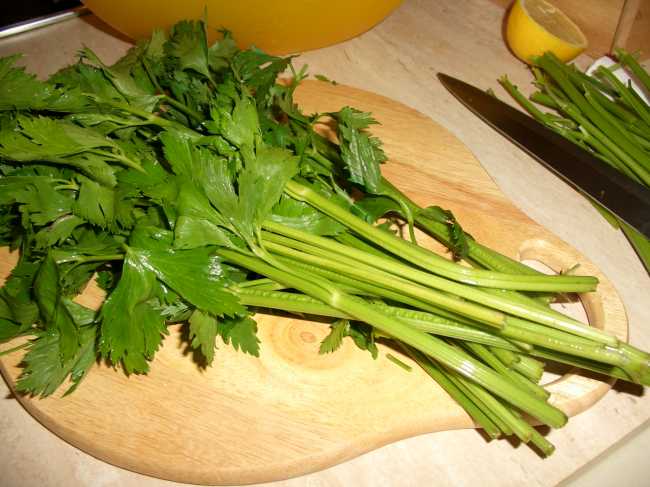
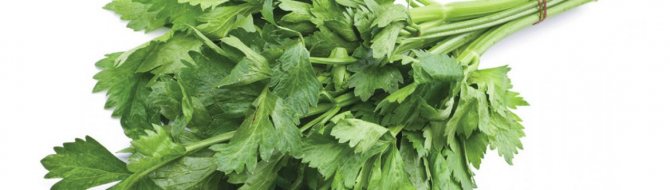
Celery greens are sorted, getting rid of yellowed and wilted leaves. Then it is rinsed to remove dust and dirt in cool water. To get rid of excess liquid, lay the grass on paper towels and dry.
You can dry greens in whole branches, individual leaves or in crushed form.
Drying methods
Greens can be dried in four different ways:
- On air. The greens are laid out on flat plates or racks and put in a dark place, preferably in a draft. To prevent celery from rotting, it needs to be tossed quite often. The twigs can also be dried in bunches by hanging them on a rope with their foliage down.
- In the oven. Greens should be dried at the minimum temperature of the device, with the door open. Celery is placed on baking sheets in a thin layer. After every hour in the oven, the product should be checked for readiness.
- In an electric dryer. The greens are dried using a special mode designed for drying herbs. The temperature on it is programmed no higher than 40 degrees, which allows you to preserve as much as possible all the beneficial properties and aromatic substances.

- In the microwave. This method is only suitable for a small amount of greens, and requires constant monitoring of the cooking process. The chopped herb is placed on paper plates and placed in the oven. The power of the unit is set at 700 W, and the exposure time is 2 minutes. After the beep, the celery is checked for readiness. If necessary, repeat the procedure.
Watch this video from Excellent Farming on how to air dry celery greens.
How to properly store leaf celery - methods
First of all, I would like to note that there are several possible options here. For example, stalk and leaf celery can be kept dry, or stored in:
- refrigerator;
- freezer;
- dry salting.
Each of these options has its own characteristics. For example, if you intend to store the plant in the refrigerator, then first of all you need to thoroughly rinse it with water. Carelessness at this stage is simply unacceptable. It is necessary to thoroughly rinse each leaf of the plant - literally. Therefore, everything must be done slowly, conscientiously. Next, the plant should be laid out to dry on gauze or some other fabric that can absorb moisture well. The celery can then be wrapped in aluminum foil and stored in the refrigerator. It is not recommended to use polyethylene film in this case. The thing is that in this case the leaves and petioles will wither in just 2-3 days. Therefore, you should only wrap celery in aluminum foil.
The plant can also be stored in the freezer. This is perhaps the simplest option. At the same time, it is storage in the freezer that allows you to preserve the primary color and smell of the plant. The celery will look like it was just picked from the garden or bought at the store. If you decide to store the plant in this way, then you must first chop it finely. Next, place the celery in containers and place in the refrigerator. By the way, here you can use special forms. They allow you to store the plant more compactly, thereby saving scarce space in the freezer. After all, you can freeze not only celery for the winter, but also other plants or berries, which a skillful housewife is always ready to find a use for.
You can also store celery in dried form. In this case, the plant must first be prepared. It’s easy to guess that we need to dry celery so that we can then use it as a seasoning when preparing a number of dishes. The preparation procedure itself is very simple. You just need to place the plant on a baking sheet or tray and cover it with a sheet of thin paper. This way you will protect the leaves and petioles of celery from the unwanted, in this case, exposure to direct sunlight. Next, we place our workpiece in a warm, dry place and leave it there for about 1 month. After 30 days, we check how well the plant has dried. By and large, a visual inspection is quite sufficient for this.
Interesting: Ginger for weight loss, how to store it
Another fairly simple way to store leaf and petiole celery is dry salting. After all, salt, as you know, very well prevents plant rotting. Accordingly, its use helps preserve all the beneficial properties of celery. First of all, you need to prepare glass jars. They should be washed thoroughly, and in addition, they should also be doused with boiling water. In this way, you are guaranteed to destroy various pathogenic microorganisms that may well end up on the walls or bottom of the container. You also need to prepare salt at the rate of 100 grams per 5 kilograms of celery. First, pour pre-chopped greens into the jar. After this you need to add salt. Next, simply close the container with a lid and leave it for 2 days.
Now let's look at how to properly store celery root. There are also several options here, all of which are very simple and do not require any specific knowledge. And it won’t take you much time to prepare. So, root celery can be stored dried. To do this, first peel the plant. Next, dry them in a well-ventilated, warm room. After this, take a grater of a suitable size and carefully chop the roots. Now all that remains is to place the resulting mass in bags, which, in turn, should be placed in the freezer.
There is a second, alternative drying option. By and large, here you need to do all the steps described above. The only difference from the previous option is that the plant is not grated, but cut crosswise or into strips. After this, make sure to place the celery in a glass container and close the lid tightly. Regardless of which option you choose, the plant, if properly prepared, will certainly retain most of its beneficial properties.
You can also store root celery at home in sand. Moreover, there are several options here too. For example, celery can be pre-packaged in plastic bags, pressing the roots together. Wooden boxes are also good for this. However, the option with packages is more convenient. Next, cover the roots with a layer of sand about 2 centimeters deep. After this, we place the container in the cellar. The recommended storage temperature is from 1 to 2 degrees Celsius.
The second option involves the presence of a deep container. Fine sand should be poured into it, into which the roots of the plant should then be stuck vertically. Please note that they should eventually be completely covered. Next, we simply take the container to a cool, dark place - preferably, of course, to the basement. The main thing is that it is not too damp there. Here you need to store the plant at a slightly different temperature. In particular, the recommended range is from 8 to 10 degrees Celsius. However, it is possible for the room to be even cooler.
First of all, I would like to note that there are several possible options here. For example, stalk and leaf celery can be kept dry, or stored in:
How to dry petiole celery
Product preparation
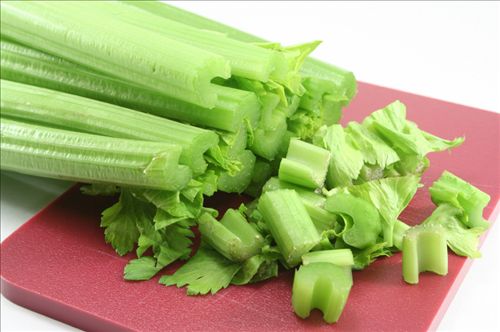
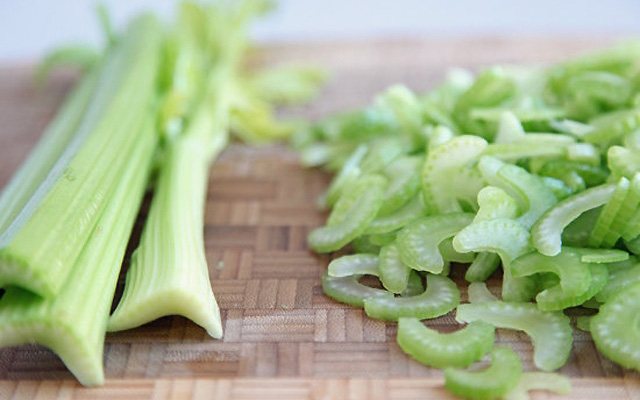
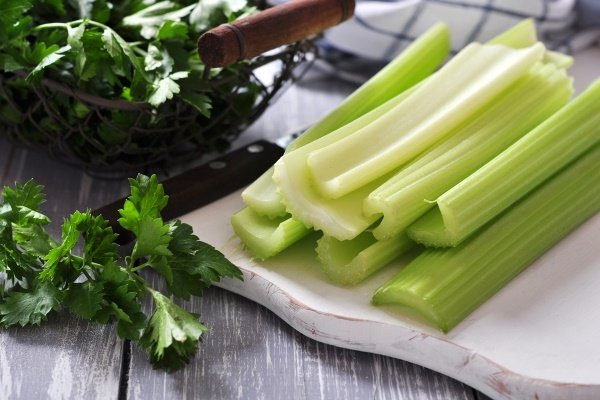
Celery petioles are sorted out, removing damaged and wilted stems. Then the greens are washed and chopped into small cubes, 1.5 - 2 centimeters long. The finer the celery is chopped, the faster it will dry out.
Drying methods
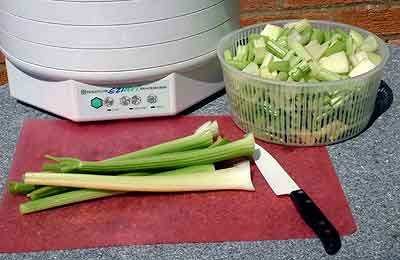
The main methods of drying stalked celery are in the oven and in an electric dryer.
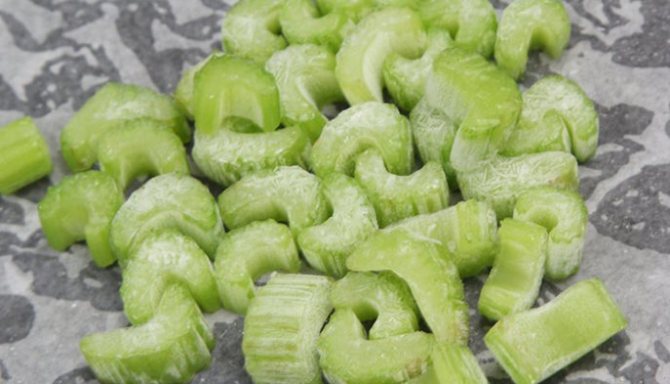
The oven temperature is set at 60 degrees, and the door ajar allows air circulation. Pallets with chopped petioles are placed in the oven for 2 hours. After this time, the pieces are mixed. Drying continues in this mode for 10 - 12 hours.
If an electric dryer is used for dehydration, then the temperature on it is set to 55 - 60 degrees. To ensure that the pieces dry evenly, the racks are swapped from time to time.
How to store dried celery
Any type of celery should be kept in dark glass or plastic jars. The lid must be screwed tightly to prevent moisture from entering. The shelf life of dried celery is 1 – 2 years.
Various parts of celery are used for culinary purposes. Fleshy roots are added to soups, fish dishes and salads. Petiole celery is also the basis of many salads, and the greens are an excellent herb. We will talk in more detail about how to preserve dried celery harvest in this article.
Drying greens for the winter: the best ways
Hardly anyone today imagines cooking without the use of herbs. In addition to the fact that it is a tasty and aromatic seasoning for various dishes, it is also a storehouse of useful substances. For example, parsley contains four times more ascorbic acid than lemon. And 100 g of spinach contains 25% of the daily iron requirement for humans. The best ways to preserve valuable substances for a long time in plants used in cooking are freezing and drying. We’ll talk about how to properly dry greens in this article.
Interesting: When to dig turnips in Siberia
How to dry celery root
Product preparation
Root crops for drying should be dense, light-colored, without damage or rot. The roots are thoroughly cleaned of soil residues and washed in running water.
To remove the thick skin, you will need a sharp knife or vegetable peeler. Peeled root vegetables should be chopped. This can be done in several ways:
- chop the root using a coarse grater;
- cut into thin long strips using a knife or a special grater for Korean salads;
- chop the celery into thin slices using a vegetable peeler;
- cut the vegetable with a knife into rings no more than 5 millimeters thick.
How to dry leaf celery
Product preparation
Celery greens are sorted, getting rid of yellowed and wilted leaves. Then it is rinsed to remove dust and dirt in cool water. To get rid of excess liquid, lay the grass on paper towels and dry.
You can dry greens in whole branches, individual leaves or in crushed form.
Drying methods
Greens can be dried in four different ways:
- On air. The greens are laid out on flat plates or racks and put in a dark place, preferably in a draft. To prevent celery from rotting, it needs to be tossed quite often. The twigs can also be dried in bunches by hanging them on a rope with their foliage down.
- In the oven. Greens should be dried at the minimum temperature of the device, with the door open. Celery is placed on baking sheets in a thin layer. After every hour in the oven, the product should be checked for readiness.
- In an electric dryer. The greens are dried using a special mode designed for drying herbs. The temperature on it is programmed no higher than 40 degrees, which allows you to preserve as much as possible all the beneficial properties and aromatic substances.
- In the microwave. This method is only suitable for a small amount of greens, and requires constant monitoring of the cooking process. The chopped herb is placed on paper plates and placed in the oven. The power of the unit is set at 700 W, and the exposure time is 2 minutes. After the beep, the celery is checked for readiness. If necessary, repeat the procedure.
Watch this video from Excellent Farming on how to air dry celery greens.
How to dry petiole celery
Product preparation
Celery petioles are sorted out, removing damaged and wilted stems. Then the greens are washed and chopped into small cubes, 1.5 - 2 centimeters long. The finer the celery is chopped, the faster it will dry out.
Drying methods
The main methods of drying stalked celery are in the oven and in an electric dryer.
The oven temperature is set at 60 degrees, and the door ajar allows air circulation. Pallets with chopped petioles are placed in the oven for 2 hours. After this time, the pieces are mixed. Drying continues in this mode for 10 - 12 hours.
If an electric dryer is used for dehydration, then the temperature on it is set to 55 - 60 degrees. To ensure that the pieces dry evenly, the racks are swapped from time to time.
How to dry celery leaves
Aromatic celery greens can be dried either in twigs or leaves, or in chopped form. To do this, you need to sort out the grass, eliminating limp and yellowed leaves. After this, the celery is washed in cool water. It is better to pour the liquid into a bowl than to use running water, this way the entire surface of the curly branches will be washed. Next, the bundle is laid out on paper towels and allowed to absorb excess moisture. If you decide to chop celery greens for harvesting, chop the leaves with a knife into fairly large pieces.
You can use the oven to dry. To do this, it is heated to 40 degrees, the greens are placed on a baking sheet lined with cooking paper, the door is left ajar so that the grass does not bake, and it dries out. Leaves should be checked every hour for readiness.
An electric dryer is also used. For processing greens, the device has a special mode - up to 40 degrees. The grass is placed on drying sheets and the process is monitored, periodically changing trays for uniform processing. The process will take 6-7 hours.
You can also air dry the leaves. The greens are hung in bunches with the crown down or distributed on a bed of clean cloth or paper in a thin layer. Place the litter in a ventilated place, possibly in a draft. Air flows will help quickly remove moisture from the leaves. Ideally, you should use gauze stretched at a height. By airing on both sides, the spice will dry faster. The greens need to be stirred periodically to ensure even drying. This method will take about 2 weeks.
It is important not to keep the herb in dust or near sources of strong odors so that this does not affect the quality of the spice. Also, do not use newspaper as bedding. Printing ink is very harmful to health and should not come into contact with food.
For quick processing, greens can be placed in the microwave. You need to keep the leaves in the chamber for about 2 minutes and check for readiness. The procedure may need to be repeated.
How to Preserve Celery Leaves for the Winter
Leaf celery can be stored for the winter without much effort. Adding the product to food saturates any dish with vitamins and microelements. To make supplies for the winter, use one of several proposed methods, and if you want to diversify your diet, do it all at once.
- Drying.
- Freezing.
- Dry pickling.
- Storage without any manipulation.
Each housewife will choose her favorite method.
Drying leaf celery
There is no need to invent anything to dry the harvest. The cut green part is washed, dried and chopped.
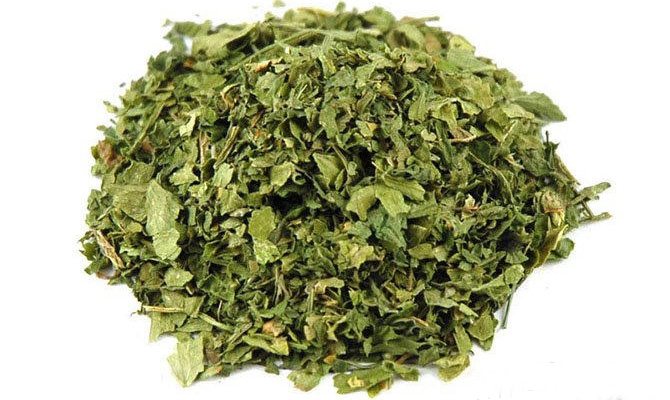
Dried plant fragments are poured into a fabric bag or glass container. This is how celery preparation preserves vitamins and essential oils.
You can also dry them in bunches. To do this, wash the cut crown, remove damaged fragments, and tie it up. Hang in a dry room with good air circulation. As an additional option, you can dry the herbs spread out on the table. Since the process is lengthy, it is recommended to cover the greens with gauze.
How to dry celery root at home
Celery roots are dried into strips or slices. Wash and peel the fruit, scrape out any irregularities. After this, the root needs to be crushed:
- grate on a coarse grater;
- cut into strips;
- peel into slices using a vegetable peeler;
- cut into thin rings.
The prepared root is dried in the usual ways:
- on air;
- in the spirit of the closet;
- in an electric dryer.
In order for the spice to dry correctly and retain its vitamins, you need to choose a temperature of up to 60 degrees, distribute the product evenly among the sheets and periodically stir or turn over. The oven door is left open to allow air circulation, otherwise the vegetable will bake in its own juices.
During drying, the root is not salted or other seasonings are used. Drying time can take about 10-12 hours, this will depend on the size of the slices. Thinly sliced celery will dry out quickly and will keep for a long time. Thick slices may not dry out from the inside. This product may rot and have to be thrown away, so be careful.
Benefits of celery
First, let's try to understand what properties this greenery has? People use only three types of celery, although there are more than 30 of them. Celery is very different from other types of greens. Take, for example, the high content of minerals and vitamins in it. It also contains more than 40 types of salts and vitamins C and B. As mentioned above, celery is actively used in cooking. Moreover, it can be used in any form: it can be stewed, fried, or eaten raw. Stewed celery roots are ideal as a side dish for fish dishes. And the leaves are used to make a seasoning that is suitable for any dish. In order for celery to add the right flavor to a dish, it must be prepared correctly. For example, celery roots, before adding to the soup, must be fried on one side, but without oil. In general, it should be said that celery is a very thin herb that requires a lot of attention. If used incorrectly, you can lose the vitamins and nutrients it contains.
Homemade celery recipes
During the winter months, the umbrella crop, which has a unique composition, is not always sold in stores. Many housewives have learned to prepare leaves, petioles, and root vegetables on their own, which allows them to preserve essential oils, amino acids, vitamins and other components until the beginning of summer.
Using a simple recipe that is suitable for home use, it is not difficult to make seasoning. To do this you need to take a bunch:
- dill;
- celery;
- parsley
The greens are chopped with a knife, ground with a glass of salt and placed in glass jars.
Some gardeners prepare various vegetables in the fall to put them in borscht in the winter and eat them fresh. Following the recipe, use:
- carrots, tomatoes and onions – 1 kilogram each;
- dill, parsley, celery - a bunch each;
- pepper – 300 grams.
The greens and tomatoes need to be chopped, the remaining vegetables should be chopped. The workpiece is mixed with a spoon of salt and placed in jars in the refrigerator.
How to dry celery
To begin with, it should be said that drying celery is practically not much different from drying parsley or other greens. But this only applies to leaves. But, as you know, not only leaves, but also roots are dried in celery. It is rare to find greens that can be used, as they say, “from root to tip.”
Drying celery leaves
The process of drying leaves is quite simple. Its implementation does not require the use of any devices or artificial methods. All you need to do is spread the leaves on paper and leave them in the fresh air. It is preferable not to leave the leaves in direct sunlight. It’s better to leave it in the shade; in summer weather the temperature here is also quite decent. Turn the leaves periodically to dry evenly. The finished dried leaves are thoroughly ground and stored in glass jars. In this way, the seasoning will be stored almost all winter.
Drying root vegetables
Drying celery root vegetables will take more time. To begin with, you should choose healthy root vegetables that bugs and pests have not had time to touch. Wash them thoroughly to eliminate soil odors. We peel them from the surface layer and cut them into small pieces. It should be remembered that the smaller the pieces, the less time it will take to dry the celery. So, lay out the chopped root vegetable on a towel or paper, at your discretion, and place it in the sun. Stir the root vegetables periodically. There is an opinion that celery roots can be dried in the oven. This is wrong. The roots should be dried only in the open air or using special dryers. As soon as you notice that the pieces have already dried thoroughly, you need to grind them thoroughly. At this stage, you can use a blender or food processor. Root vegetables, unlike leaves, have a harder composition. Therefore, it will take at least one week to thoroughly dry them. You can also store chopped root vegetables in glass jars. Celery is a seasoning that gives any dish not only a pleasant aroma, but also a healthy taste. And by drying celery, you can eat only healthy and tasty food all year round.
Found a mistake? Select it and press Ctrl+Enter. We will be grateful for your help. Category: AT HOME | 148 | Complaint Rate:
How to Freeze Celery Stems
One option for preparing celery for the winter is to freeze it. This is a fairly simple and convenient way to store this product.
Required Products:
- Celery stalks – the amount you need;
- ice for cooling water.
Preparation:
The first step is to separate the stems from each other. This will help thoroughly wash each one without leaving behind any sand or dirt.
Afterwards, the celery stalks should be cleared of hard threads by prying the ends with a knife. Cut to the size you need.
Next, the celery should be blanched. To do this, you need to boil water and add chopped celery into it. After the water boils again, boil for up to 2 minutes.
Important! Blanch celery to extend its shelf life when frozen.
While the celery is on the stove, you need to prepare ice water. Add a handful of ice cubes to cold water.
Drain the celery in a colander and immediately place in ice water. This will help you quickly stop the cooking process. Throw the already cooled pieces into a colander again and leave for a while so that all the water drains.
Place paper towels in two layers on a clean table. Place pieces of celery on them so that they do not touch each other. Blot the top with another paper towel. Leave for 30 minutes.
Next, take a cutting board, wrap it in plastic and place pieces of celery on top of it, so that they do not touch each other. Place in the freezer for 2.5-3 hours to freeze.
Next, transfer the frozen pieces to a plastic container or plastic bag and return to the freezer for storage.
Harvesting celery for the winter
Various parts of the plant are eaten:
All of them are equally useful and can be equally used in preparing celery for the winter. The optimal time for harvesting home-grown celery is October. The petioles are separated from the foliage and root part, sorted, damaged stems are removed, dried and placed in plastic bags with small holes for air access. In this way, celery can be stored in the refrigerator for several months.
In basements, the harvest can be stored without separating the root crops from the greens, placing them in boxes with sand.
Before canning, freezing, or drying, celery must be processed. It is thoroughly washed and dried. The toughest fibers are removed from the stems with a knife and the damaged areas are cleaned. The peels are removed from the root vegetables.
Celery preparations for the winter do not need to be thawed before heat treatment if they are chopped finely enough.
Harvesting petiole celery
The most widely used celery is stalked celery, the winter preparations of which are frozen, pickled, salted separately and with other seasonings.
The largest amount of vitamins in its stems is preserved when frozen. The petioles are cut into several pieces, placed in bags or plastic containers and placed in the freezer.
To increase the shelf life of celery before freezing for the winter, its stems are blanched (doused with boiling water).
Salting is another way to store stalked celery in preparations for the winter. For 1 kg of greens you will need 200-250 g of fine table salt. The stems are cut into pieces 1-1.5 cm long, mixed with salt in a plastic container, then tightly placed in sterilized glass jars. After a while, when the celery releases juice, the jars are closed. Such preparations are stored in the cold (cellar, refrigerator).
Recipes for celery prepared for the winter include pickling, drying, salting, and canning in combination with various vegetables. To pickle celery you will need:
- water – 1.5 l;
- petioles – 1 kg;
- vinegar 9% - 2 tbsp. l.;
- sugar – 8 tbsp. l.;
- salt – 2 tbsp. l.;
- black pepper – 6 peas;
- bay leaf – 4 pcs.;
- garlic – 7 cloves.
The amount of spices can be changed to suit your taste. Celery stalks are cut into slices 1-2 cm wide. Liter glass jars and their lids are sterilized.
To prepare the marinade, sugar, salt and vinegar are dissolved in water and boiled.
Place chopped celery and garlic in jars and add bay leaves. Then pour in the boiled marinade, roll up the lids and allow to cool. Celery pickled for the winter is mainly used in salads. It is also added to soups, stews, and side dishes.
Preparation of leaf celery
Celery leaves are no less beneficial for health than its roots and stems. Greens can be harvested throughout the season. It is cut off with a sharp knife as it grows.
How to prepare leaf celery for the winter
You can show your imagination and use other methods of preparing fresh leaf celery in the winter without losing the beneficial components of the plant. There are no useless parts in the plant. Celery can be added to ready-made dishes and prepared on its own as healthy foods. Leaf celery and recipes for its preparation for the winter are in demand today, as it is a source of valuable natural ingredients.
Pickled celery leaves for the winter
Pickled green parts of leaf celery go well with vegetables, sometimes they are combined with fruits and berries.
To prepare leaf celery for the winter according to the recipe you will need:
- leaf celery - 1 kg;
- garlic cloves - 10 pieces;
- bay leaves - 4 pieces;
- peppercorns - 8 pieces.
For the marinade take:
- water - one and a half liters;
- vinegar 9% - 400 ml;
- salt - 100 g;
- sugar - 100 g.
It is important to follow the algorithm of actions.
The green mass of celery is washed and sorted. Garlic and bay leaf are placed at the bottom of a sterilized jar. Cut pieces of leaf celery are compacted tightly on top. The containers are filled with hot marinade and sterilized for 25 minutes. Sealed up hermetically.

Leaf celery seasoning
Spicy celery seasoning is used as a sauce for meat dishes, as a dressing in soups, or as an independent dish.
To prepare you will need:
- green parts of a leafy plant - 500 g;
- green parsley leaves - 500 g;
- garlic - 500 g;
- bell pepper - 1 kg;
- hot pepper - 1 pod;
- tomato paste - 500 g;
- salt - 140 g;
- sugar - 150 g;
- vegetable oil - 150 g.
The algorithm of actions is as follows: all ingredients are passed through a meat grinder, mixed until smooth, and the workpiece is covered with thick plastic lids. Store in a cold cellar at 5 degrees. The output of the finished product is three liter containers or 6 half liter jars.
Leaf celery for the winter, dry salting
Dry salting can be used to preserve large volumes of leaf celery. The product is used as a flavoring additive to various dishes. It is important to consider that a large amount of salt is used to obtain the final result.
To prepare you will need:
- green leaf celery - 1 kg;
- salt - 250 g.
The greens are pre-washed and dried, chopped, mixed to obtain a homogeneous mass and placed in jars. When liquid appears above the surface of the tightly packed grass, the containers are sealed. The workpiece is stored in a cool place, away from light.
Storing fresh green celery leaves
Those who prefer to pamper themselves with fresh bunches of celery all year round dig up the plant along with the roots in the fall. They bury it in an earthen cellar. You can also cut the crown from the root, dry the petioles, wrap it in film, and place it on the refrigerator shelf at +1 temperature.
Following simple recommendations, the greens are stored until spring.
How to dry celery root
Product preparation
Root crops for drying should be dense, light-colored, without damage or rot. The roots are thoroughly cleaned of soil residues and washed in running water.

To remove the thick skin, you will need a sharp knife or vegetable peeler. Peeled root vegetables should be chopped. This can be done in several ways:
- chop the root using a coarse grater;
- cut into thin long strips using a knife or a special grater for Korean salads;
- chop the celery into thin slices using a vegetable peeler;
- cut the vegetable with a knife into rings no more than 5 millimeters thick.
Drying time using any of the methods below will depend on the method of grinding the product.
Drying methods
Celery root can be dried using the following methods:
- On air. The crushed root is placed on baking sheets, sieves or grates in a thin layer. The containers are placed in a dry and well-ventilated area. It is better not to expose the vegetable to direct sunlight. The cuttings need to be stirred periodically. Drying time – 14 – 20 days.
- In the oven. Line baking sheets with parchment and place celery on them. Drying should be carried out in an oven preheated to a temperature of 50 - 60 degrees, with the door slightly open.
- In an electric dryer. The temperature on the device is set within 50 degrees. The racks with celery are swapped every 1.5 hours to ensure uniform drying. Drying time – 10 hours.

A video from the Ezidri Master channel will show how to properly dry celery and parsley roots in an electric dryer
How to dry leaf celery
Celery greens are sorted, getting rid of yellowed and wilted leaves. Then it is rinsed to remove dust and dirt in cool water. To get rid of excess liquid, lay the grass on paper towels and dry.
You can dry greens in whole branches, individual leaves or in crushed form.

Greens can be dried in four different ways:
- On air. The greens are laid out on flat plates or racks and put in a dark place, preferably in a draft. To prevent celery from rotting, it needs to be tossed quite often. The twigs can also be dried in bunches by hanging them on a rope with their foliage down.
- In the oven. Greens should be dried at the minimum temperature of the device, with the door open. Celery is placed on baking sheets in a thin layer. After every hour in the oven, the product should be checked for readiness.
- In an electric dryer. The greens are dried using a special mode designed for drying herbs. The temperature on it is programmed no higher than 40 degrees, which allows you to preserve as much as possible all the beneficial properties and aromatic substances.

- In the microwave. This method is only suitable for a small amount of greens, and requires constant monitoring of the cooking process. The chopped herb is placed on paper plates and placed in the oven. The power of the unit is set at 700 W, and the exposure time is 2 minutes. After the beep, the celery is checked for readiness. If necessary, repeat the procedure.
Watch this video from Excellent Farming on how to air dry celery greens.
Leaf celery: recipes for winter
Petiole celery is often used in cooking to prepare various salads, soups and snacks. Juicy and aromatic stems give ready-made dishes a piquant taste and a pleasant aroma, and also contain many vitamins. To successfully preserve this product for the winter, various preparations are prepared from it, which are perfectly stored until spring. This article lists the beneficial and harmful properties of celery, and also provides step-by-step recipes for preparing the most popular snacks from this plant.
- Useful and harmful properties
- Recipes for celery preparations for the winter Freezing
- Pickled root and stalks Pickled celery root
- Pickled celery stalks
Petiole celery is often used in cooking to prepare various salads, soups and snacks. Juicy and aromatic stems give ready-made dishes a piquant taste and a pleasant aroma, and also contain many vitamins. To successfully preserve this product for the winter, various preparations are prepared from it, which are perfectly stored until spring. This article lists the beneficial and harmful properties of celery, and also provides step-by-step recipes for preparing the most popular snacks from this plant.
How to keep celery fresh
The fruits of the umbrella culture do not lose their main components for 7 days if they are placed in a plastic wrap in the refrigerator. For long-term fresh storage, the vegetable is placed in sand and taken to the cellar or placed in cellophane bags and sent to the basement, where there is high humidity and the air temperature is within one degree.
Root crops will not rot until spring if they are laid out in rows in the cellar.
For petiole and leaf celery, storage options are also selected:
- The greens are salted, allowed to brew for a couple of days and rolled into jars.
- The fresh herbaceous plant is frozen in molds with ice. It loses neither aroma, nor vitamins, nor amino acids.
- Leaves that are placed in dishes are left in the freezer, packed in a plastic container that does not allow air to pass through.
Celery wrapped in foil stays fresh and fresh for more than a week in the refrigerator. In plastic film it withers in 3 days.
The plant, dug up by the roots, along with a lump of earth, is placed in the sand in the basement. It will last until spring.
The plant, dug up by the roots, along with a lump of earth, is placed in the sand in the basement. It will last until spring.
Dried celery leaves
Leaf celery is best preserved by drying it. This way, most of the nutrients and vitamins are retained.
Required Products:
- Leaf celery - the amount you need.
Preparation:
First you need to separate the leaves from the thick stems. Rinse the branches from dirt. Place the wet leaves in a colander and let the water drain. Then place on paper towels and let the leaves dry completely.
You need to cut the celery coarsely. After this, you need to decide how you will dry your leaves. There are several options: In a special dryer for vegetables and fruits, in the oven, or in natural conditions, that is, in the fresh air.
After completely drying the celery leaves, you need to pass it through a coffee grinder to grind it. The end result is an excellent celery seasoning.
Good to know! The prepared spice should be stored in a glass container with a tight-fitting lid.
Required Products:
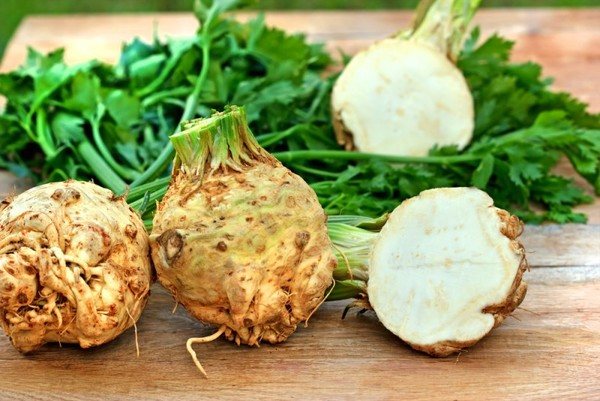
Methods for storing celery root vegetables
If you grow this most useful vegetable plant in your garden, you will find it even more useful to know how to store celery root or its greens throughout the winter. No matter how much celery you plant, you can always find a use for it: when you add frozen or dried herbs, soups acquire a special aroma, grated frozen root vegetables add a piquant taste to dishes, celery is also good in a marinade with tomatoes or on its own. Petioles, root vegetables and celery leaves can be stored fresh for quite a long time, used for salads or for decorating ready-made dishes with bright herbs.
Tap the root crop - a ringing sound indicates the presence of voids inside the root
When harvesting root vegetables for further storage, cut off the leaves of the celery, leaving small petioles. When buying root vegetables at the market or in a store, make sure that they have smooth skin and a smooth, non-knobby surface, then it will be easier to clean the roots in the future. Tap the root vegetable - a ringing sound indicates the presence of voids inside the root. Check to see if the celery is rotten by pressing on the top of the root.