Characteristics of raw materials for crafts
Not today did craftsmen come up with the idea of using pumpkin as a material for creativity.
Just look at the traditions of making Halloween attributes from it. The creation of dishes from decorative pumpkins in the republics of the North Caucasus and Central Asia has been practiced for several centuries. It is believed that the water in such dishes does not spoil for a long time, does not heat up in the heat, and even helps in the treatment of diabetes. For crafts by modern designers, decorative pumpkins of two common types are used.
- Cucurbita are small bright fruits of cheerful red, orange and golden colors. Beautiful in themselves as an element of autumn garden decor, such pumpkins can serve as material for making lanterns and flower pots. The disadvantage of this material is that its bright colors will fade after a few months.
- Lagenaria - it is from them that you can so easily make a bottle, vase, ladle and much, much more. The hard crust of this species changes color over time from green to golden yellow or light brown.
In order to show your creative abilities and throw out a charge of ideas, there is nothing better than handmade crafts. It is especially pleasant to work with such a natural material as pumpkin, it is so expressive and flexible.
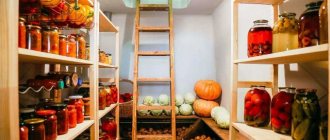
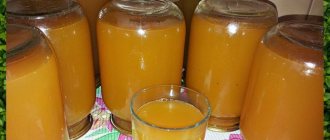
Canning pumpkin
Two important notes when canning pumpkin. First, the pumpkin should be sweet and firm. Secondly, it must be cut into pieces.
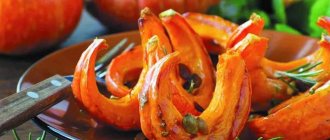
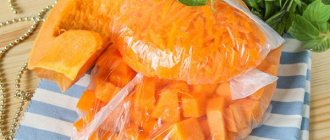
- Bring a large pot of water to a boil. Peel and cut the pumpkin. Cut into 2 cm pieces. You must first blanch the pumpkin pieces in boiling water for two minutes.
- Remove blanched squash using a special spoon and transfer to clean canning jars. There is no need to sterilize the jars for this recipe.
- Add one tablespoon of lemon juice per quart to each jar.
- Pour the pumpkin blanching liquid and lemon juice into jars. The pumpkin should be completely submerged in liquid.
- Close the jars with lids.
How to preserve pumpkin
See also: Wheatgrass juice and its properties
Preparing for the long drying process
It should be immediately noted that preparing pumpkins for crafts and for food has significant differences. In the first case, it is necessary to create as rigid a frame as possible, which will last for many years. And in the second - to preserve as much as possible the beneficial properties and vitamins contained in the vegetable. However, for both tasks there is a general rule that it is advisable to adhere to: try to choose only healthy fruits with an even skin color and without signs of spoilage and rotting.
For decoration
Now let's look at how to prepare and what to look for when choosing vegetables for decorative purposes. For crafts, experienced needlewomen recommend using two types of pumpkin: “cucurbita” and “lagenaria”. They come in bright yellow, orange and red colors and are perfect for making lanterns, pots, vases and bottles.
To properly dry decorative pumpkins, select specimens that have a stalk. Without it, drying will not proceed correctly, since moisture should evaporate from the fruit naturally. And the stalk and pores on the surface of the vegetable are best suited for these purposes.
Algorithm
- Before drying, thoroughly wash the selected pumpkins with soapy water.
- Dry with paper towels and store in a dark, dry place for several hours.
- After the future decor has dried well, wipe it with alcohol.
- Place the art material in a dark place again.
- After 1-2 weeks, making sure that the shell has hardened sufficiently, you can begin to thoroughly dry it.
For food
To properly dry pumpkins for eating:
- Wash the fruits well and peel them. Then cut in half and remove the seeds.
- Cut the pulp into voluminous pieces at least 3–5 cm wide: during drying, the pumpkin decreases greatly in size.
- Place the prepared pieces in one layer at the bottom of a shallow container. Sprinkle them with sugar at the rate of 200 g per 1 kg of vegetables.
- Place the treat in a cool, dark place and place a press on it for 15–17 hours.
- After the specified time, drain the resulting juice and leave the vegetables for another 10–12 hours.
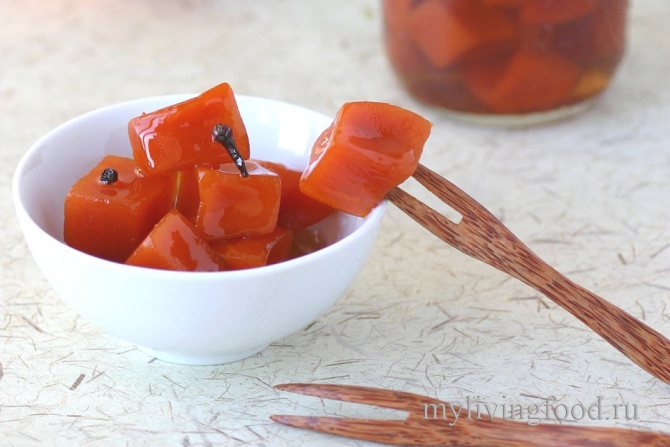
- Transfer the fruits and juice into a saucepan, add a little more sugar and boil for 15 minutes. Then place the candied preparations in a colander.
Now the pumpkin is ready for further drying. All that remains is to choose the most suitable method.
Before drying a pumpkin for crafts, it must be properly prepared. The surface of the fruit is washed with soapy water and dried well. Then the pumpkin is wiped with alcohol or any other alcohol-containing liquids.
We suggest you read: How to properly store pumpkin • whole and cut
After this, the decorative material is transferred for a week to a well-ventilated room, isolated from direct sunlight. There the pumpkin remains until the color of the shell changes. This usually happens within 1-2 weeks. Hardening and darkening of the shell is an indicator that the surface of the pumpkin has dried out.
How to dry pumpkin for long-term storage
Proper drying is a delicate process, and also requires a fair amount of patience. If a fruit of a normal shape can dry from 3 months to six months, then a thicker-skinned lagenaria will require at least 10 months (or even 1 year).
The main rule is that shrinkage should be natural. Some try to speed up its progress by “running it” in the microwave or oven, but this negates all the decorative value of the fruit: with the slightest mistake, the pumpkin will turn out baked, and it would be wiser to eat it. With such heat treatment, the structure of the fibers is disrupted, and as a result, the peel loses the necessary rigidity.
Therefore, it would be better to let the moisture escape “by chance.” The role of drainage is assigned to the pores covering the surface of the fruit and the stalk. Immediately before drying the whole ripe pumpkin chosen for decoration, you will have to place an oilcloth or a piece of thick film under it - over time it will naturally leak. This is a necessary condition for indoor storage .
This method is the most widespread and simple, but it has its own nuances that it is advisable to keep in mind:
- The fruits are laid out (or better yet, hung) on a loggia or balcony. If you plan to store it lying down, try to place the pumpkin on a table with frequent gaps between the slats - they will ensure proper ventilation.
- Do not forget about constant air circulation (for these reasons, solid countertops and closed cabinets, warm kitchens or musty cellars are not suitable).
- For the first couple of weeks, the workpieces are inspected every day, rejecting overly soft or wrinkled specimens. There is one tricky point here related to mold. It may appear on the peel from exposure to moisture flowing from the fruit. Such “traces” are easily erased, but after a couple of days they appear again. This is not scary - at the end of drying you will see an unusual pattern on the “skin” of the vegetable.
- Unripe pumpkins rot most often, affecting their ripe “colleagues.” When you see a small stain, try to press on it with your finger - the rot will succumb immediately, and it is better to throw out such a specimen. Due to inexperience, the “effect” of rot can be confused with mold, which was mentioned in the paragraph above.
- For uniform drying, weekly turnings are required (at least once a week and a half). This simple manipulation will prevent the pumpkins from rotting.
- First of all, the fruit is cut off along with a 4–5 cm tail. You shouldn’t tear it off - moisture evaporates much worse through an uneven hole, which will slow down the whole process.
- The tail is also required (severed stalks are very susceptible to rot).
- The future “decor” is hung separately or placed on ventilated wooden pallets. Otherwise, the requirements are the same: regular inspection and “rolling” with rejection as necessary.
How to properly harvest?
A lot depends on this event - it is impossible to carry out a high-quality drying process using damaged material.
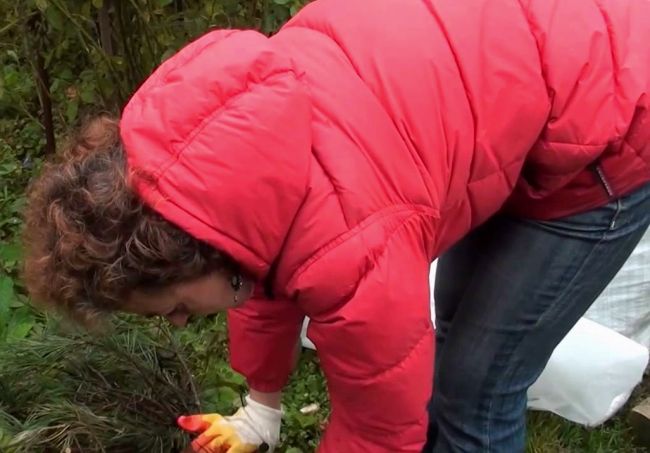
When collecting decorative material from the garden, you need to follow a certain technology.
- The crop is harvested after the stalks of the plant dry out and turn brown.
- The fruits are removed by cutting off the stalk at a distance of 6-10 cm from the plant, without breaking it off at the base.
- Damaged, rotten, spoiled pumpkins are discarded and their place is on the compost heap.
AdviceThe fruit must have an ideal appearance, since even a small spot of rot can cover a large area in a few weeks.
- There is no need to wait for frost to collect slightly unripe decorative pumpkins - their color may change for the worse.
Large specimens intended for food and feed purposes are almost impossible to dry due to the large amount of dense, bulky pulp. We'll have to leave them for delicious porridge, candied baked pumpkin and a carriage for Cinderella.
Methods for drying food grades
You can dry the future dessert in the oven, electric dryer, microwave, or naturally.
In the sun
- Place the cut pieces on a wire rack lined with parchment paper and place in a well-ventilated area.
- After 2 days, mix the preparations and leave to dry for another 2-3 days. Make sure that they are not exposed to sunlight during this period.
- After the fruits have dried, place them in the sun.
- After 1–1.5 weeks, transfer the finished dessert into glass jars and put it in the refrigerator.
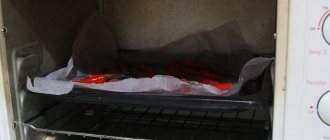
In the oven
- Arrange the pumpkin pieces on a baking sheet in a single layer.
- Dry in the oven at 80°C for about half an hour.
- Reduce the temperature to 70 °C and simmer the workpieces for another 40–50 minutes.
- Remove the dried pieces from the oven and cool.
- Repeat the drying process 2 more times.
In an electric dryer
- Pre-dry the pumpkin for 50–60 minutes at maximum temperature.
- Reduce it to 65 °C and bring the product until cooked.
In the microwave
When drying pumpkin in the microwave, be especially careful and careful, as the risk of spoiling the product is very high. Do not set the oven power to more than 600 W. To prevent vegetables from burning, remove them periodically and turn them over.
How to store decorative pumpkin and crafts made from it
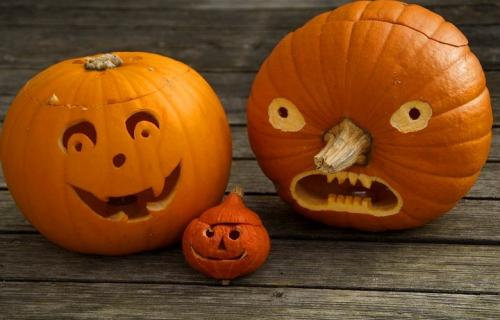
The first thing that comes to mind is the Halloween “head”. But the decorative “abilities” of the steep-sided culture do not end there.
- The simplest candlesticks, lanterns or boxes (it all depends on the size of the workpiece).
- Openwork lamps or clocks that ideally complement the interior of a living room or gazebo.

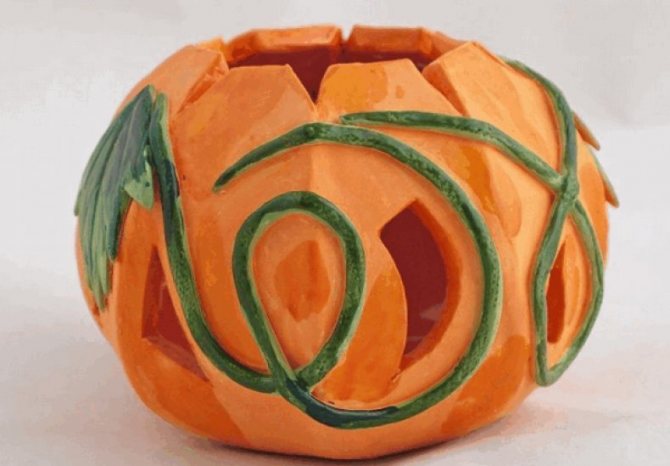
- Toys of varying degrees of complexity - faces and boats, carriages or “assembled” men made from several pumpkins.

It turns out that the range of crafts made from prepared decorative pumpkins is limited only by the imagination of the master. But the blanks themselves play an equally important role, which is worth mentioning separately.
A small plant weighing from 100 to 500 g is best suited for such purposes. You can take all ripe and healthy “round plants” from this weight category. Fruits with more impressive “dimensions”, in turn, are distinguished by thicker pulp, which is more likely to rot than to reach the required condition.
Naturally, the pumpkin must be intact, without scratches, let alone cracks. The place of collection and its time are no less important. So, the optimal choice would be a fruit hanging on a dried brown vine. But unripe, too loose or “snatched” by the first frost specimens should be immediately put aside.
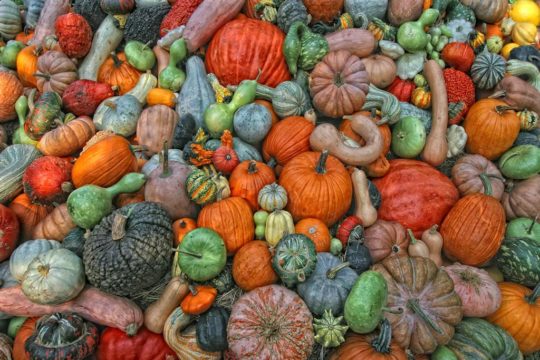
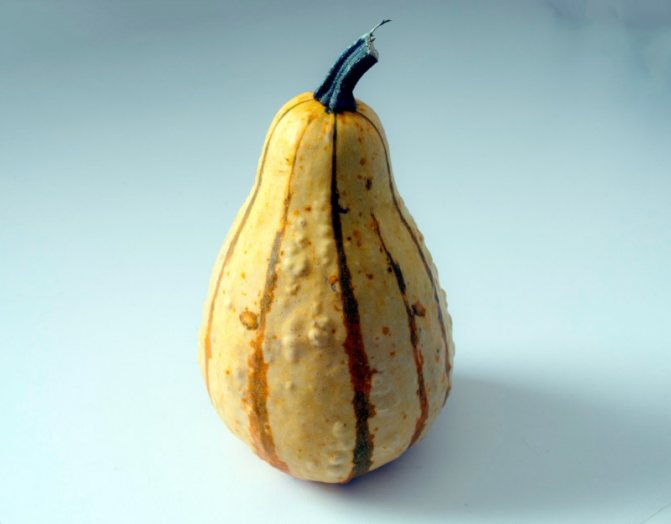
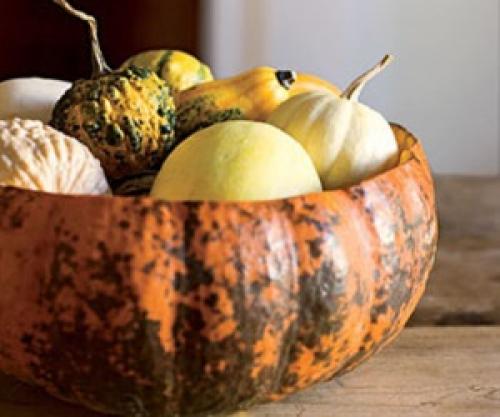
A separate theme is decorative melon lines. The most popular of them are the following varieties:
- “Orange”, really similar to citrus. Small sizes (up to 300 g) combined with bright color make such fruits a desirable decoration. In appearance, they can be either spherical or slightly flattened.
- "Tangerine" These crumbs are easily recognized by their smooth skin with underdeveloped ribs.
- "Chalmoid". It is distinguished by the unusual appearance of its fruits, which seem to be assembled from two parts. The variety is considered large and amazes with a variety of design options. Instances with a large upper half are often called fungi.
- "Baby Boo", which, due to its small (10 cm) diameter and white color, can be mistaken for a giant garlic.
- "Kleine Bicolor". The contrasting color scheme of the pear is highlighted by a clear border: a dark green bottom with light stripes gives way to a rich yellow top.
- "Sweet Dumpling" Quite large (400–500 g) fruits with ribs delight the eye with alternating white or yellowish “edges” and green stripes with frequent white dots running along their entire length.
Proper drying is a delicate process, and also requires a fair amount of patience. If a fruit of a normal shape can dry from 3 months to six months, then a thicker-skinned lagenaria will require at least 10 months (or even 1 year).
The main rule is that shrinkage should be natural. Some try to speed up its progress by “running it” in the microwave or oven, but this negates all the decorative value of the fruit: with the slightest mistake, the pumpkin will turn out baked, and it would be wiser to eat it. With such heat treatment, the structure of the fibers is disrupted, and as a result, the peel loses the necessary rigidity.
Therefore, it would be better to let the moisture escape “by chance.” The role of drainage is assigned to the pores covering the surface of the fruit and the stalk. Immediately before drying the whole ripe pumpkin chosen for decoration, you will have to place an oilcloth or a piece of thick film under it - over time it will naturally leak.
- The fruits are laid out (or better yet, hung) on a loggia or balcony. If you plan to store it lying down, try to place the pumpkin on a table with frequent gaps between the slats - they will ensure proper ventilation.
- Do not forget about constant air circulation (for these reasons, solid countertops and closed cabinets, warm kitchens or musty cellars are not suitable).
- For the first couple of weeks, the workpieces are inspected every day, rejecting overly soft or wrinkled specimens. There is one tricky point here related to mold. It may appear on the peel from exposure to moisture flowing from the fruit. Such “traces” are easily erased, but after a couple of days they appear again. This is not scary - at the end of drying you will see an unusual pattern on the “skin” of the vegetable.
- Unripe pumpkins rot most often, affecting their ripe “colleagues.” When you see a small stain, try to press on it with your finger - the rot will succumb immediately, and it is better to throw out such a specimen. Due to inexperience, the “effect” of rot can be confused with mold, which was mentioned in the paragraph above.
- For uniform drying, weekly turnings are required (at least once a week and a half). This simple manipulation will prevent the pumpkins from rotting.
- First of all, the fruit is cut off along with a 4–5 cm tail. You shouldn’t tear it off - moisture evaporates much worse through an uneven hole, which will slow down the whole process.
- The tail is also required (severed stalks are very susceptible to rot).
- The future “decor” is hung separately or placed on ventilated wooden pallets. Otherwise, the requirements are the same: regular inspection and “rolling” with rejection as necessary.
By the way, about waste. Get ready for the fact that even with the correct maintenance, 7–10% of the workpieces will go to the compost pit - this is the price to pay “for beauty.”
In addition to the two main methods, there is one more. This is storage “on a vine”, which is practiced by followers of the most natural agricultural technology. Everything is simple here - the fruits dry without being removed from the plant. For best effect, they are placed in divided sections of a fence or palisade with prepared niches.
The obvious advantages of such drying are excellent ventilation coupled with good “preservation” of the ripened pumpkin, which is not afraid of rain or frost. After cutting, it lends itself well to varnishing or painting. The only drawback that stands out is the vulnerability of such plantings - they can easily become the prey of dacha thieves or suffer from large animals.
Finished products from prepared fruits have a long shelf life. In order for them to delight you with their appearance for many years, you need to remember a few simple rules:
- The room temperature should be within 12... 28 °C. Sudden changes are contraindicated.
- Dampness and contact with moisture are excluded. The same applies to the sun's rays. The best option would be to keep it in a dry, dark corner.
- Immediately after processing (cutting or varnishing), it is advisable to open the surface with colorless nail polish or transparent furniture varnish. This will preserve the “structure” for a long time and will prevent it from becoming cracked or getting wet when exposed to a few drops of water.
- They try not to keep the dried “artistic” vegetable outdoors in the open (regardless of the time of year). To decorate gardens and gazebos it will have to be shaded.
Now you know how to turn a seemingly inconspicuous culture into a masterpiece of applied art. We hope everything works out without too much difficulty. Success in creative work!
The following types of pumpkins are used as decoration:
- Lagenaria. It has a “bottle” shape and can be used to make a bottle, ladle, vase and more. It is green in color but turns yellow-brown when dried.
- Cucurbita. Not a large pumpkin with bright colors (red, orange, golden). After a couple of months of drying, the colors fade. Lanterns and flower pots are made from these fruits.
There are also a variety of decorative varieties of pumpkins, some of the most popular are:
- Tangerine. Small pumpkins with smooth skin and not very prominent ribs.
- Turban-shaped. The fruit looks as if it consists of several parts. This variety of pumpkin is large and has a bizarre appearance; the upper part often looks like a mushroom cap.
- Sweet Dumpling. Large vegetable with ribs. The color alternates with white, yellow, green stripes and white spots.
- Orange. Spherical or flattened small fruits of bright color.
- Little Boo. Small white pumpkins that look like huge garlic.
What tools and devices are used? Sometimes kitchen utensils are used to dry pumpkins as decoration. But in this case, there is a possibility that the vegetable will simply bake and not dry out and then spoil very quickly.
The following devices and temperature conditions can be used for drying:
- Dry in the oven at 80 degrees. The vegetable is placed in the center of the oven and periodically turned clockwise.
- In an air fryer, the drying temperature is approximately 70 degrees.
- The pumpkin is dried in an electric dryer at 80 degrees.
- Microwave drying is carried out at 600 Watt mode.
We invite you to familiarize yourself with HIPP Tea Wild berry tea - “Today, Hipp tea with wild berries has changed a lot. HIPP children's tea - is it really made from berries? Two children's reaction to seagulls."
During the drying process in any of the devices, you need to turn the fruit from side to side so that it does not burn.
How to dry completely? A whole pumpkin can be dried entirely using two methods:
- Using the devices listed above.
- Natural drying in a well-ventilated area or in a garden bed will be very effective, but will take a very long time.
How to dry cut ones? Pieces can also be dried using these two methods. To do this, you need to prepare, cut the pumpkin into the necessary pieces and remove the fibers and seeds.
The process of drying ornamental vegetables should be approached carefully. Preparation for drying:
- Wipe off any visible dirt with a soft cloth.
- Rinse the surface under warm running water.
- Dry with a towel.
- Leave in a dark, dry place for 60 minutes, then wipe again with a dry cloth.
- Make sure the peel is completely dry.
Further drying can take place indoors at room temperature (there is a high risk that the vegetable will rot). You can also speed up the process using various devices:
- air fryer;
- electric berry dryer;
- microwave;
- oven.
You can dry the decorative pumpkin whole or in parts, depending on the desired result. There are several methods for preparing vegetables for creativity.
Whole drying
To obtain a whole piece, choose a small fruit. Drying can be done in a dry room without insects. It will take at least 3 months, during which the vegetable is regularly turned over to check for rot or mold. You can also use an oven.
In the oven
The simplest and fastest drying method. Algorithm of actions:
- Preheat the oven to 60 degrees, and place the pumpkin on a baking sheet covered with parchment. Keep the door open.
- Turn the vegetable over and check every 10-15 minutes.
- Dry for 2-8 hours, depending on size.
In the oven
- dishes;
- vases;
- Halloween decor;
- figures of cartoon characters and animals;
- candlesticks;
- caskets;
- interior decorations.
- The simplest candlesticks, lanterns or boxes (it all depends on the size of the workpiece).
In the sun
- Place the cut pieces on a wire rack lined with parchment paper and place in a well-ventilated area.
- After 2 days, mix the preparations and leave to dry for another 2-3 days. Make sure that they are not exposed to sunlight during this period.
- After the fruits have dried, place them in the sun.
- After 1–1.5 weeks, transfer the finished dessert into glass jars and put it in the refrigerator.
In the oven
- Arrange the pumpkin pieces on a baking sheet in a single layer.
- Dry in the oven at 80°C for about half an hour.
- Reduce the temperature to 70 °C and simmer the workpieces for another 40–50 minutes.
- Remove the dried pieces from the oven and cool.
- Repeat the drying process 2 more times.
In an electric dryer
- Pre-dry the pumpkin for 50–60 minutes at maximum temperature.
- Reduce it to 65 °C and bring the product until cooked.
In the microwave
- Cut off the top of the pumpkin and remove all the pulp.
- Using a sponge, disinfect the outer and inner surfaces of the product with alcohol.
- Stuff the fruit with old newspapers and place it in a warm, dry place, preferably in the sun.
- Change the paper filling as the newspapers get wet, but at least 2-3 times a day.
- After 3 days, you can use the pumpkin head to make crafts. However, keep in mind that the creative object will last no more than 2-3 weeks, then it will begin to deteriorate.
- The decorative pumpkin is washed and dried. After this, you need to cut off the top and completely remove the pulp. A custom spoon or a convenient construction scraper can help with this.
- Now the internal and external surfaces of the product must be disinfected. At home, you should use alcohol or vodka for this. We wet a sponge in the chosen product and use it to blot the material.
- We stuff the prepared fruit with newspapers and put it in a dry and warm place. A shelf on a sunny wall, the surface of a cabinet, even a window sill will do.
- We change newspapers every 6-8 hours as they get wet. Drying time is 2-3 days.
- First, preparation is carried out, during which the surface of the fruit is thoroughly washed using a soap solution. After this, dry the pumpkin and wipe it with an alcohol-containing liquid.
- Then the workpiece must be temporarily sent to a room with good ventilation. The product should not be exposed to direct sunlight.
- After 1-2 weeks of this exposure, the surface of the vegetable will change its color and become much harder. This is a signal that you can move on to the next stage.
- Now begins the simplest but tedious time. The final drying of the product takes up to six months, after which the component becomes as hard as wood. All this time, the workpiece should be kept in a room with good ventilation and a minimum of light. It is better if it is suspended from the ceiling. If it is not possible to organize such drying, we make stands with holes through which the product will be constantly blown.
- At the initial stage of drying pumpkins, you need to check them regularly. Fruits that rot or shrivel should be thrown away; they will no longer be good for anything. If mold appears on the hard bark, we try to carefully wipe it off with a dry cloth. If the material underneath the colony softens, the product is discarded.
- Vegetables should be rotated every couple of weeks so that they do not develop “bedsores” and drying occurs evenly.
- Cucurbita are small bright fruits of cheerful red, orange and golden colors. Beautiful in themselves as an element of autumn garden decor, such pumpkins can serve as material for making lanterns and flower pots. The disadvantage of this material is that its bright colors will fade after a few months.
- Lagenaria - it is from them that you can so easily make a bottle, vase, ladle and much, much more. The hard crust of this species changes color over time from green to golden yellow or light brown.
Is it possible to dry pumpkin quickly?
The answer is categorical - no, no, and again no. Drying the pumpkin quickly and evenly over several days in an oven, microwave, or electric dryer will not work. It may seem like the pumpkin is dry because it has a hard skin, but in addition to the skin, you also need to dry the flesh evenly. This can take several months, and the Lagenaria pulp takes twice as long to dry as the Cucurbita pulp.
People often wonder how to dry pumpkin quickly? But no way! There are processes in nature that cannot be accelerated. Until the moisture comes out of the pumpkin naturally - through the pores on the fruit and stalk - you cannot lure it out in any other way. On the Internet you can find options for drying pumpkin for decoration in the oven, microwave, air fryer... But this will already be a baked pumpkin. Better eat it. This pumpkin won't last long.
Do not microwave pumpkin for crafts - the results may not be impressive.
Thus, the only possible option for drying a decorative pumpkin for crafts is to leave it alone. Nothing more is required from you. But in the right place.
- Right on the vine. This is the best, natural way. A healthy, ripened fruit is not afraid of frost, rain and other vagaries of nature. Moreover, to dry a pumpkin, in addition to time, one more factor is needed - air, air movement, ventilation. Not light, not warmth, but fresh, not stale air. Therefore, if possible, dry the pumpkin directly on the plant.
You will know that the fruit has completely dried out from the inside by the changed color of the skin (in lagenaria it will turn from green to brown or brown-yellow; in ordinary pumpkins it will fade slightly, but may remain the same), light weight, as well as by the sound of the seeds, dull “jumping” inside the fruit when shaken. From such a pumpkin you can already cut, paint and varnish whatever your heart desires, after first cutting off the neck and removing the seeds.
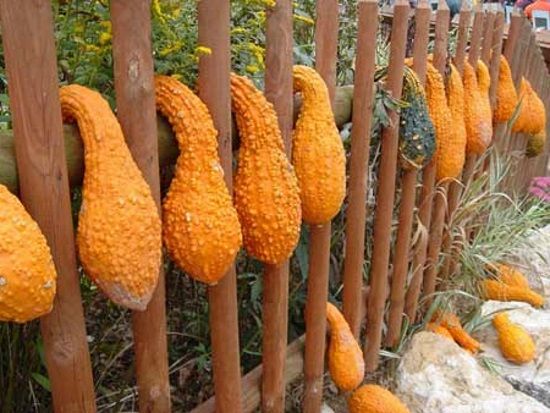
Crookneck squash will dry perfectly right on the fence
- Outdoors. If you are afraid that in your absence the beautiful decorative pumpkins will be stolen from the vine, you can cut them off and dry them in the open air. Before drying a pumpkin for crafts, cut it off with a tail about 5 cm long. Just cut it, and do not tear it off, since through the “torn” hole the moisture will evaporate much worse, and the pumpkin will take longer to dry.
It is also impossible to leave a pumpkin to dry without a tail at all - there is a high probability of rot occurring precisely at the site of the stalk, since pumpkin juice will actively be released from it. Cut pumpkins are placed on wooden pallets, or better yet, hung. The fruits should not touch each other. Please note that some varieties of pumpkins emit an odor during drying. Unpleasant.
- At home. It’s good if circumstances allow you to dry the pumpkin outdoors. But in the lion's share of cases, the fruits have to be taken home to dry. How to dry a whole pumpkin at home, considering that it needs air? Perhaps only on the balcony, loggia. You can leave pumpkins for the winter in an unheated country house. Basements, cellars, warm kitchens, closets - all this is not suitable for drying pumpkins. They will rot badly and dry out slowly.
- no matter how good your pumpkins are, there will still be a minimum percentage of rejection during drying (5-10 percent). This is fine. Unripe pumpkins rot the most. To prevent rot from spreading to healthy fruits, inspect them from time to time. If you notice a spot that presses in when pressed with your finger, this is rotten, throw the pumpkin away immediately.
— to be on the safe side, you can treat the pumpkins before putting them in drying. This is especially true if you are not sure that the pumpkins are ripe. So, the fruits are carefully washed, slightly dried and wiped with alcohol or some alcohol-containing mixture. This will disinfect the skin and make the possibility of rot less likely to occur.
- before drying a decorative pumpkin on a balcony or in another room, place an oilcloth under it - during drying it will begin to “flow”.
Halloween Pumpkin Crafts. Pumpkin for Halloween
Halloween is approaching, which means it's time to start preparing for the holiday. We present to you a master class on making the most popular accessory for All Saints' Day - a jack-o'-lantern.

In the West, pumpkins burning in the night have a special meaning. It is believed that they symbolize the souls of the dead, who are forever stuck between the world of the living and the world of the dead, and therefore are doomed to eternal wanderings and torment. The pumpkin is called Jack's head. According to legend, this was the name of the cunning drunkard farmer. They say that he deceived the devil himself and forced Satan not to take his sinful soul to hell. It’s just that Jack’s road to heaven was closed, so after his death he had to look for the road to the other world on his own. When Jack again asked the devil for help, he mockingly only threw him a few coals from hell. The farmer carved a head-shaped lantern out of a pumpkin and put coals in it. So he wandered in the pitch darkness, illuminating his path with this terrible head.
This is where the tradition of carving pumpkins on All Hallows' Eve came from. In Russia, this holiday is not as popular as in Western countries, and is more of an entertaining nature, and for us a pumpkin is just a sinister and interesting attribute for a party. We will tell you how to cut it correctly.
What do we need?
- pumpkin
- awl or thick needle
- spoon (if possible, it is better to take a special one for carving)
- a knife with a thin and sharp blade (a carving knife is also better, but this is not necessary)
- marker
- stencils (we have already made a selection of suitable images - get them here)
- candle or portable flashlight
Tip: If you always celebrate Halloween, look for a carving set. You'll be surprised how easy the process of cutting out a Jack O' Lantern is. Don't go too big: a modest three-piece set (knife, scraper spoon, and needle knife) is a great option. If you are not sure that you will often carve pumpkins, replace everything with the items we wrote about above
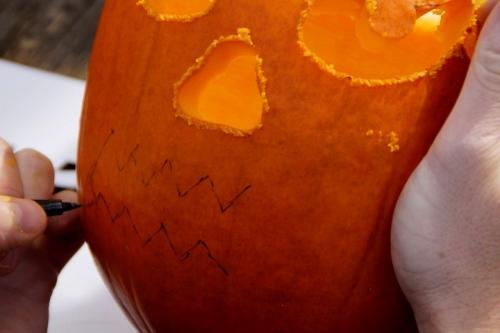
How to carve a pumpkin?
First let's talk about pumpkin. The standard size is 20-30 cm. Of course, you can take a larger or smaller vegetable. Make sure that the tail is dry. The fact is that pumpkins with a wet tail are already overripe and are beginning to deteriorate, which means they will last less. Please note that it is better to cut out lanterns on the eve of Halloween or 1-2 days before the party. The pumpkin will begin to rot already on the fifth day after cutting.
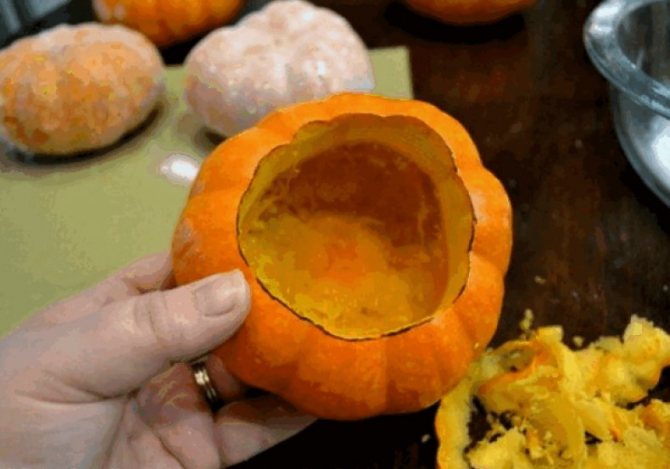
We wash and dry the pumpkin, marking a place to cut off the top. Carefully cut off the cap. Don't throw it away, we'll need it later. Let's scrape the pulp from it, cut out two neat triangles so that the lid allows air to pass through when the lantern is lit. Now let's wash it and let it dry.
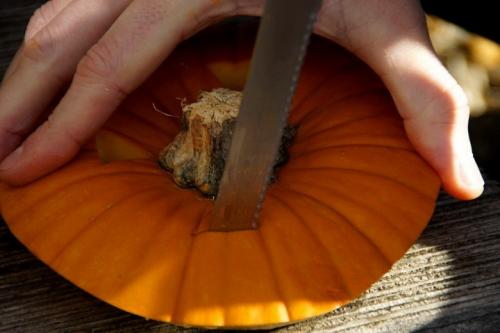
Now let's get to the pumpkin itself. Most of the pulp can be removed directly with your hands. Everything on the walls needs to be scraped out with a spoon. Don't skip sections, this is important. If there is any pulp left inside the vegetable, the lantern will spoil faster.

The hollow pumpkin needs to be washed from the inside and dried very well. To do this, we will leave her alone for two to three hours, preferably in the open air. At this time you can start making stencils. Choose any drawing you like. Print it out or be prepared to draw it. When the pumpkin is dry, start drawing the image with a marker and cutting out holes using a thin knife.
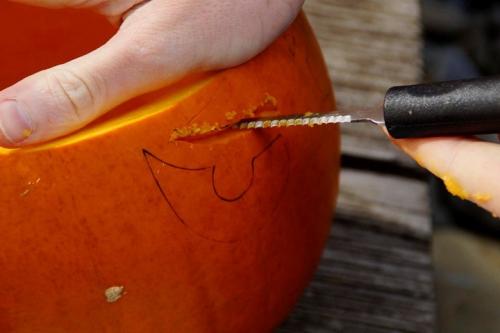
Don't be afraid to make a mistake - the marker can be easily removed from the pumpkin with a damp cloth
Hollow out thin and small parts along the contour using an awl and or a special needle for carving.
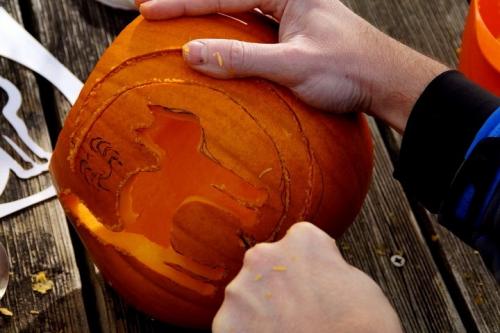
Clean the finished product from the pulp that formed during the cutting process and dry it again a little. Then you can place a candle on the bottom of the lantern. Do not take thin and long candles, because they will soften the lid. It is better to take small candles in glass or metal candlesticks and simply place them inside.
This is what pumpkins look like in daylight.

This is how they glow in the night (in this case, a candle in a glass candlestick).

If you can handle the simplest faces, try carving a black cat, a bat, or something else interesting and sinister.

If you have small children in your home, ensure safety. It's better to stop using candles and use regular portable flashlights for your Halloween party. With them, the pumpkin will also burn, but if someone decides to put a finger in Jack’s mouth, it will not result in tears.

Make some flaming jack-o'-lanterns and throw a themed Halloween party!
Features of drying decorative species
Methods for drying decorative species depend on how long you need the craft for. If you need to get creative for a school competition, use the quick pumpkin drying method.
- Cut off the top of the pumpkin and remove all the pulp.
- Using a sponge, disinfect the outer and inner surfaces of the product with alcohol.
- Stuff the fruit with old newspapers and place it in a warm, dry place, preferably in the sun.
- Change the paper filling as the newspapers get wet, but at least 2-3 times a day.
- After 3 days, you can use the pumpkin head to make crafts. However, keep in mind that the creative object will last no more than 2-3 weeks, then it will begin to deteriorate.
Another way to quickly dry your pumpkin is to use a hair dryer. Thanks to this device, you can dry the rind of a small fruit in just a couple of hours. However, keep in mind that you need to work with such a vegetable very carefully, since sudden temperature changes make its peel very fragile.
To make better quality crafts, you should dry the pumpkin for less than 6 months. During this time, the fruits acquire the hardness of wood and can retain their appearance and shape for a long time. To ensure proper drying, place vegetables in a dark place with good ventilation.
Regularly check drying workpieces and spare no expense in discarding specimens that have begun to deteriorate, wrinkle or soften. If traces of mold are found on future crafts, try removing them with bleach. You can determine the readiness of the fruits for further work by the rustling sound of the seeds when shaking and a noticeably decreased weight.
Principles of natural vegetable drying
Even before you dry the pumpkin you like to make crafts from it, you will have to properly prepare it. This process does not hide any special tricks and boils down to the following procedures:
- To begin with, the peel is washed in soapy water and thoroughly dried.
- After this, the fruit is wiped with alcohol or any liquids with its “participation”.
- All that remains is to move the pumpkin to a place protected from sunlight. Such a room should have good ventilation. The workpiece will remain there until its shell begins to change color (this is about 1–2 weeks).
Before drying a vegetable, it must be carefully prepared for the process. The algorithm of actions should be like this:
- The pumpkin peel is cleaned of dirt and washed with soapy water and warm water;
- Dry well;
- Wipe the surface of the fruit with alcohol;
How to dry a pumpkin for crafts quickly? If you do not plan to store the decorative pumpkin product for a long time, you can use the express drying method. It includes the following actions:
- Preparing the pumpkin in the usual way;
- Cutting off the top. Make the cut even and use a large sharp knife for this;
- Remove the pulp by scraping it out with a spoon so that nothing remains on the walls, otherwise the pumpkin will become moldy in a few days.
- Wiping the inner surface of the vegetable with a cloth soaked in alcohol;
- Stuffing vegetables with paper (preferably newspapers);
- Next, you should place the pumpkin in a ventilated, dark place and constantly change the stuffing inside it as the paper gets wet.
How to dry a decorative pumpkin correctly and for a long time, but efficiently? Natural drying remains the best way. For this method, select fruits that are not large, whole, without dents, rotting or mold.
Preparing the fruit is the most common: wash in warm water, dry and treat with alcohol.
The natural drying process can last 6-18 months. It depends on the thickness of the skin, the amount of pulp, the size of the fruit and environmental conditions.
Rules for this type of pumpkin drying:
- For drying, you need to take a spare number of pumpkins. There is a possibility that not all will dry out. Some spoil early in the process;
- The fruits should not touch;
- The drying room must be well ventilated;
- It is important that there is no direct sunlight on the fruit;
- You can place the pumpkin on oilcloth so that the moisture drips onto it, or even better - on wooden pallets with a large gap between the slats so that the pumpkin has a good supply of air;
- Every day at the beginning of drying, you need to inspect the fruits for rot. Then the examination can be done once a week. All soft, spoiling pumpkins must be removed immediately, otherwise they will infect healthy ones.
- If small areas of mold appear on the peel due to the moisture released, it can be removed and the area wiped with alcohol.
We suggest you read: How to trim a decorative rabbit
You can start preparing pumpkins for this holiday several months before. Choose varieties with not very hard skin, so that you can easily cut out scary faces on the vegetable. You can cook it using the natural drying method. Also, if you don’t have time, you can use a quick drying method by stuffing it with newspapers.
In order to extend the shelf life of Halloween pumpkins abroad, they treat products with special antiseptic solutions. In our regions, you can try spraying the inside of the pumpkin with a bleach solution to prevent the proliferation of microorganisms.
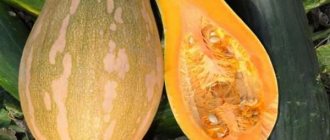
Bottle gourd is quite light, and when dried it becomes almost weightless. This species does not allow moisture to pass through itself well. The preparation of the fruit and the drying process are normal. Some nuances of drying this type of pumpkin:
- A natural drying method is used for this species and it is recommended to do it outside.
- The oven and other appliances are not used to ensure that the fruit retains its shape and dries evenly.
- This pumpkin is dried in a hanging state or on a wire rack.
- For the first few weeks, keep the pumpkin in a bright place, but without direct sunlight, when the pumpkin hardens, it is moved to a dark room and dried until it is ready.
Pumpkin readiness is determined by the following indicators:
- By color. When dried, the vegetable should become dull; Lagenaria usually turns yellowish-brown.
- The vegetable loses its weight.
- If you shake the pumpkin, it makes a dull sound of seeds jumping inside it.
Finished dried fruits can be stored for a very long time. To do this, you must comply with the following conditions:
- The room temperature should be 12-28 degrees without sudden changes.
- Avoid dampness and contact with moisture.
- Direct sunlight should not fall on the decorative product.
- Immediately after processing the pumpkin (for example, carving), it is recommended to varnish its surface to extend its shelf life.

To make a dried pumpkin preparation for the winter or to dry a pumpkin for decoration, you need to follow special rules. Drying methods differ from each other, as they serve different purposes, and pumpkin varieties differ in their properties depending on their purpose.
The key to getting a good result is choosing the right fruit. Not every variety is suitable for drying and making crafts. Decorative varieties have a rounded shape and pronounced convexities. The surface of the “inedible” pumpkin has an even orange or brown color. It is easy to determine the maturity of a decorative pumpkin. You need to shake the cut fruit - if you can hear the rumble of seeds inside, it means the harvest is ripe.
The size of the vegetable is chosen based on your creative idea. The smaller the product should be, the smaller the fruit can be taken. It is better to avoid drying giant fruits yourself!
Regardless of the grade and size chosen, the surface should be hard, smooth, and free of dents, soft spots, and signs of rot. Only a healthy fruit will produce a complete dry product. It is important that the pumpkin has a stalk. If the fruit is cut incorrectly, the juice will leak out during the drying process and the insides will begin to deteriorate.
Popular varieties of decorative pumpkin:
- Small orange (8-10 cm in diameter);
- Small warty (10-16 cm in diameter);
- Pear-shaped (10-12 cm long);
- Ten praises (10-15 cm in diameter);
- Large-fruited turban (30-50 cm in diameter);
- Lagenaria vulgaris ("bottle");
- Baby boo (diameter 10 cm).
How to dry a decorative pumpkin correctly and for a long time, but efficiently? Natural drying remains the best way. For this method, select fruits that are not large, whole, without dents, rotting or mold.
How to dry a decorative pumpkin It is easy to dry a decorative pumpkin, especially if it grows in your own garden. In general, it dries on its own, you just have to watch this process and wait for the right moment when you can pick up a knife and start making something unusual and amazing.
The main thing is not to cut the pumpkin from the stalk for as long as possible; ideally, you need to wait until the frost is about to begin and only then can you harvest the long-awaited harvest. Pumpkins that have dried in natural conditions are of much higher quality, stronger and more durable than those that were removed from the field ahead of time and dried at home.
Determining the maturity of a decorative pumpkin is very simple: if you pick it up and shake it, you will hear the rumble of seeds inside. This means that the pulp has already dried, the seeds are also dry and they move freely in the cavity of the fruit.
If you do not have your own garden and the opportunity to wait for the pumpkin to ripen and dry completely, then you can dry it at home. You need to do this the same way as with a regular pumpkin.
How to dry an ordinary pumpkin Pumpkin takes a long time to dry - this is the main truth that you need to come to terms with. In order for your craft to be stored for many years, not to wrinkle, crack or deteriorate in other ways, the pumpkin must be dried for about six months.
First, you need to cut the pumpkin, and you must leave a “tail” of at least 10 cm so that moisture evaporates from the vegetable through it. The pumpkin should be cut with a very sharp knife, and under no circumstances should it be unscrewed from the stem - this could cause an infection to get into the pumpkin and prevent it from drying out completely.
Pumpkins are dried in a cool room, you can even store them in a barn or gazebo outside, including in winter. But this only applies to mature pumpkins. Pumpkins that were picked before they ripen can be spoiled by frost. It is very important that there is a draft. Good air circulation is the main factor for high-quality drying of pumpkins, both decorative and ordinary.
Try not to let the pumpkins touch each other. They should also not come into contact with the floor surface, so it is best to place them on a grate (this will provide air access from below for good drying) or, in extreme cases, on several layers of cardboard. But the best option is to hang pumpkins. This way they will be blown with air in the best possible way.
Now all you have to do is wait, turning the pumpkins over from time to time and checking them for rot. If you notice that one of the pumpkins is starting to deteriorate, immediately remove it from the rest. Typically losses are 5-10%, or one in five to ten pumpkins.
A completely dried pumpkin has a very strong and dense structure, it is hard and quite light, since all the water has evaporated from it, leaving only dry fibers.
A quick way to dry a pumpkin There is a faster way to dry a pumpkin, but it can only be used if you do not plan to store the craft for a long time. This option is suitable, for example, for those who want to decorate their home for Halloween or some other event.
In the microwave
- Ease of cultivation. To obtain dense greenery and bright fruits, the crop needs timely watering, fertilizing, and loosening the soil. The green cover is formed naturally and does not require shaping, cutting or pinching.
- High growth rate. Within a month after planting in open ground, the pumpkin vine reaches 5 m, which allows it to be used for vertical framing of fences, gazebos, and walls. Then active flowering and fruit growth begins.
- Shape stability. Decorative pumpkin varieties retain their size, shape, and color until late autumn.
- Carefully remove visible dirt from the surface of the plant;
- Rinse the pumpkin in a shower of warm water;
- Wipe off surface moisture with paper towels;
- Leave in a dark, dry place for an hour, blot again with a towel and dry completely;
- Dry the pumpkin.
Entirely
- Tangerine or spherical
If you need to make a craft for a short period of time
For numerous autumn competitions in kindergartens and schools, you can make a spectacular craft using pumpkin dried at home in a short time. The disadvantage of this method is that the craft will not last even 2-3 weeks. But if such a goal was not initially set, then you can try to extend the life of the product.
To do this, you need to cut off the top of the fruit and completely remove its pulp. For this operation, you can use a construction scraper, spoon and other devices.
Next, the scraped and disinfected fruit is stuffed with newspapers and placed where it is dry and warm - on the windowsill of the sunny side of the house or apartment, on a closet. This “filling” needs to be changed as the newspapers get wet, about 2-3 times a day. The period of such drying is 2-3 days. This will happen much more slowly if the room temperature is less than 22 ⁰C.
Adviсe
To ensure the drying process proceeds without complications, use the tips below.
- Do not use large specimens intended for food or feed for decoration. Due to the large amount of pulp, they cannot be dried properly.
- Remember: the pulp of the “cucurbita” fruit dries 2 times faster than the pulp of the “lagenaria”.
- The lower the room temperature, the longer it will take to dry.
- If the peel of decorative fruits begins to peel, sand it with sandpaper, like regular wood.
- When drying your Halloween pumpkin, keep the flesh slightly moist. Therefore, start preparing vegetables 1.5 months before the holiday.
- When storing workpieces, do not expose them to sudden changes in temperature and minimize contact with water.
In practice, you can see that drying pumpkin at home is not difficult, but it requires a lot of patience. By following our recommendations, you will be able to prepare high-quality ingredients for creating wonderful crafts and preparing delicious dishes.
How to save a pumpkin for decoration. How to determine readiness?
The readiness of the pumpkin can be determined by its appearance as well as its taste.
If you want to rely on appearance, then first of all the vegetable should have a brownish tint, both the peel and the pulp. The pumpkin's crust should be tough, and the flesh should not be sticky or wet, but dried. If you taste dried pumpkin, it should feel a little chewy in your mouth, but not raw. This is the basic rule for checking the readiness of this vegetable.
We have already talked about how to store pumpkin at home and how to store it in the cellar for consumption in our articles.
How to preserve a decorative pumpkin? If you want to use pumpkin not for the purpose of eating it, but for decorating the room, then you need to know a few very important rules.
Firstly, do not leave the pumpkin in a damp and humid room and, if possible, reduce contact with moisture to zero.
The pumpkin must be kept in a place where the temperature does not exceed 30 degrees and does not fall below ten.
How to store pumpkin crafts? It is necessary to cover them on top with some kind of coating in order to prevent spoilage of the vegetable.
For example, it could be a colorless furniture varnish or nail polish. In any case, careful protection of the vegetable from all kinds of cracking and moisture is necessary.
How to store decorative pumpkin? Pumpkin must be stored in a dark and dry place. You cannot keep dried vegetables outside in both cold and warm seasons. Also, do not forget that such vegetables react very sensitively to, so do not allow this to happen.
Final drying
Here you need to be patient, which should be enough for at least 6 months. It is during this time that the decorative pumpkin will acquire the hardness of a wooden product. For high-quality drying, you need to choose a well-ventilated, dark room. It is there that at home the fruits are laid out, or better yet, hung.
At the beginning of drying, you need to check the safety of the fruits daily, and, without sparing, discard those that have begun to deteriorate, soften and wrinkle. You can try to remove small islands of mold with bleach or wiping with a dry cloth. This measure will help if there is hard bark under the mold.
Every 1-2 weeks, the fruits need to be turned to dry evenly and prevent rotting. An indication that drying has ended will be the rustling sound of the seeds when shaken, and the pumpkins themselves will become hard and light. If the decorative pumpkin becomes rough or begins to peel, it can be sanded with sandpaper in the same way as any wood product.
After this process, which requires a lot of patience, you can begin the creative work of decorating the pumpkin. Now you can paint it, varnish it, carve it, and use elements to decorate this natural material. The service life of such a product is unlimited.