Drying rules
Processing using this method has a number of features that need to be taken into account when preparing fruit for future use.
1. You should not choose overly juicy and overripe fruits.
2. For the blanks you will need medium-sized pears. Too large ones are not suitable for cooking.
3. Preference should be given to fruits with a small seed pod. It is better to harvest immediately, immediately after harvesting, otherwise they become too soft and are not suitable for drying.
4. Fruits should have a dense texture.
5. The taste of dried pears is adversely affected by viscosity, for this reason it is better not to use such varieties.

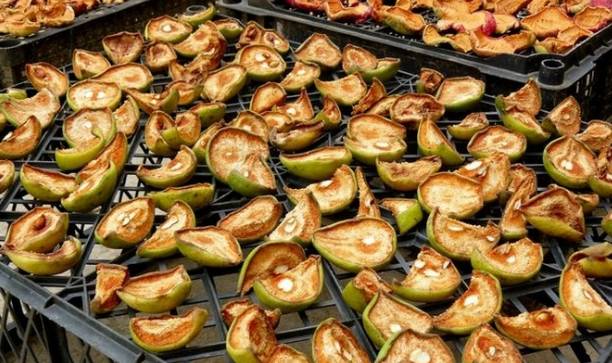
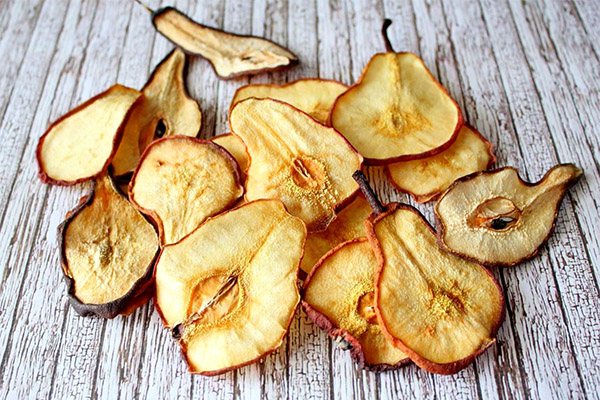
6. Dry slices 1 cm thick. Small fruits, such as wild game, can be prepared whole.
How to dry whole pears at home
Can be prepared for the winter by canning, freezing or drying. The latter method allows you to preserve the maximum amount of nutrients. Fruits can be dried, cut into slices or whole.
Preparation:
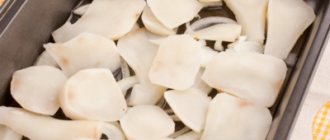
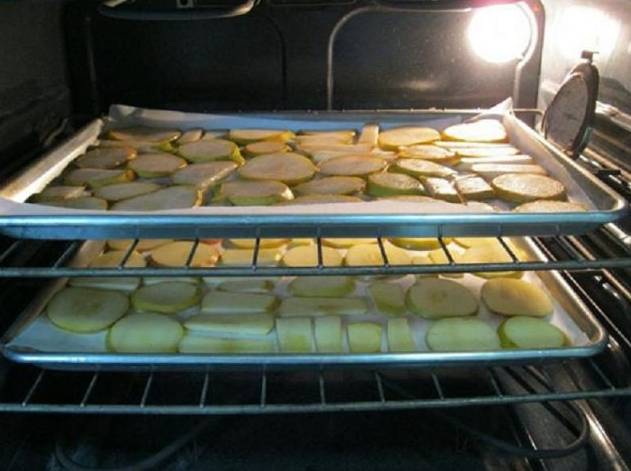
- Wash ripe pears without damage or wormholes. The fruits should be small. Trim the stalks. Place on a paper towel and dry.
- Line a high-sided baking sheet with parchment. Place the fruits on it close to each other.
- Preheat the oven to 90°C. Place a baking sheet on the top level. Bake for approximately 1.5 hours. Then turn off the heat, leaving the fruit in the oven until completely cooled.
- Take the fruit out into the fresh air and leave it in the sun until evening. Then put it back in the oven and repeat the procedure. Dry the pears for a week. The finished fruits should be dry, without signs of pulp inside.
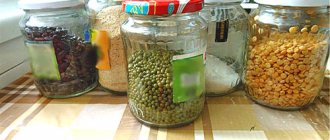
- Place the finished dried fruits in a dry, clean jar, close the lid and store in a cool room.
Fruit preparation
It is important to use quality products to preserve the delicious aroma.

Before harvesting, the fruits must be prepared appropriately.
All preparation is as follows:
- Washing and cleaning fruits;
- Thorough drying of fruits;
- Sorting of pears, rotten and overripe specimens are removed;
- The fruits are placed in a boiling liquid for 10-15 minutes, sugar is added to the liquid;
- The product is left to cool;
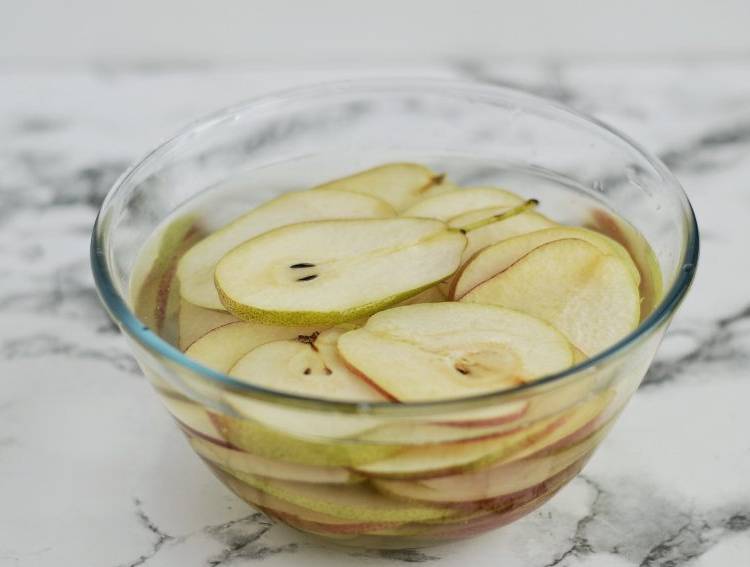
- The pears are cut, the seeds are removed, and the spoiled areas are cut off;
- To preserve the color, the workpieces are dipped in a solution of 1% tartaric or citric acid.
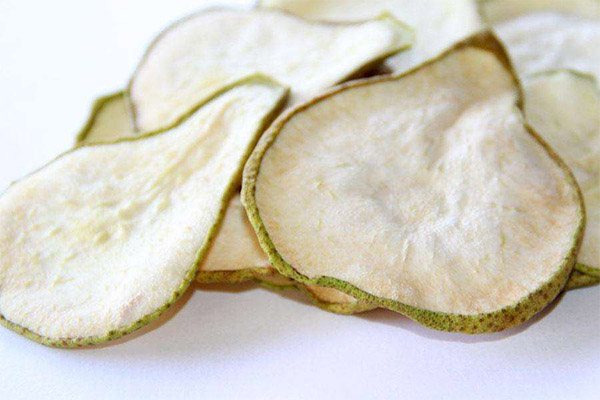
The cutting method is determined depending on the original size of the workpieces. Fruits that are not too large are chopped into slices or two parts.
Large ones are chopped into slices, not too thick in size. This way it will be possible to preserve the rich aroma and taste. For harvesting, you can take whole fruits of a much smaller size, not forgetting to remove the stalk.
Dried pear: all possible options. How to dry pears at home
Who doesn’t like to enjoy vitamin-packed summer fruits in winter? The pear is very suitable as a fruit that can be dried and stored for a long time. In this article we will look at how to properly prepare this fruit for the process, what methods can be used to dry pears and how to do it correctly.
Drying pears
The following fruits are chosen for drying pears:
- Not overripe;
- Not juicy;
- With dense pulp;
- Fruit size is medium;
- With a small amount of seeds.
Collected fruits should not be stored for more than two days, otherwise they will become soft and not suitable for drying.
Suitable varieties for this preparation:
- Fragrant;
- Ilyinka;
- Bergamot;
- Forest beauty;
- Limonka;
- Victoria.
Drying pears:
Dried pear: methods
There are several methods for drying this fruit for the winter:
- In an electric dryer;
- In the oven;
- In the microwave;
- On open air.
Preliminary processing
Whatever drying method is chosen, the pears must be prepared for it. The process of processing the fruit consists of the following actions:
- The fruits are washed;
- Wipe thoroughly;
- If you come across rotten or overripe, very soft specimens, they are removed; they are not suitable for drying;
- Place the fruits in boiling water for 10-15 minutes. You can add sugar if desired;
- Allow the fruit to cool;
- After this, the pears are cut, the seeds are removed from them, and the damaged areas are trimmed;
- To prevent the workpiece from darkening during the procedure, it must be dipped in 1% tartaric or citric acid;
As for how to cut pears, it depends on the size of the fruit. Small fruits can be cut in half or slices; large ones can be cut into pieces, but at least 1 cm thick (with this size, the pear will retain the proportions of aroma and taste). It is also possible to dry small fruits as a whole (for this you need to remember to remove the stalk).
How to dry pears in an electric dryer
Chopped fruits are placed in the device and cooked at a temperature of 70 degrees.
Cooking time is from 15 to 19 hours. While drying, the slices must be turned over to ensure even cooking.
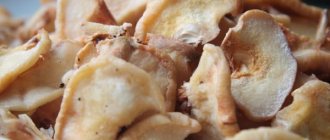
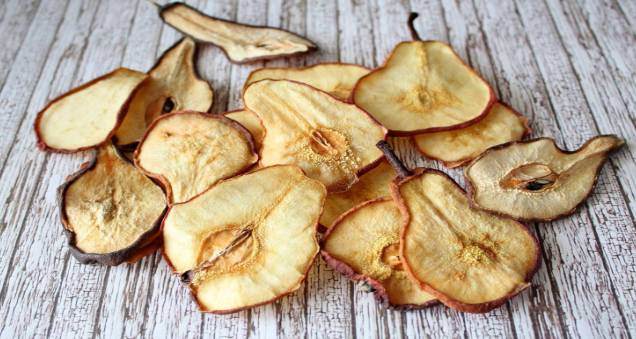
Properly prepared slices do not crumble when broken. They acquire a pleasant light brown hue, as well as elasticity.

How to properly dry pears in an air fryer
An air fryer will also not allow you to dry a lot of fruit at once: its capabilities are limited by the number of trays, and, as a rule, there are no more than four of them in standard household air fryers. More than 1 kg of pears will not fit.
Place the fruit slices on trays, which are secured in the air fryer. Set the temperature to 120 degrees. With medium ventilation mode, turn on the device for half an hour, leave the lid ajar during operation so that the moisture evaporates freely. Occasionally, the pears need to be stirred so as not to fry on the tray or walls of the air fryer. When the programmed process is completed, you need to check the readiness of the dried fruits, and if necessary, turn on the air fryer for another 15–20 minutes.
There is another option: set the temperature on the device from 50 to 65 degrees, the ventilation level is maximum. In this case, the pears will not stick to the grid trays, but the drying time will increase significantly, perhaps the procedure will take almost half a day. The air fryer will have to be turned off a couple of times for about an hour and a half so that the device cools down.
Proper drying in the sun
The product should be prepared, washed and dried, cut into thin slices. To prevent darkening, the slices are kept in 1% tartaric acid. Dip into boiling water for 2 minutes.
The blanks are evenly distributed on any plane - a piece of plywood, a board or a box. All this is exposed to the sun. A good place is on the roof of a summer cottage, provided that there is direct sunlight.
If there is no suitable place for cooking, then the slices are strung on a thread like mushrooms and hung on the sunny side. In the winter, they sometimes dry it near heating appliances.
The whole process lasts about two days. In the evening, the product is hidden indoors. Two days later, the pieces are taken off the street and left to dry in a dark place for another three days. At regular intervals they change sides.
How to store dried pears at home
To preserve the beneficial properties and quality of the product, you must follow storage rules. The main enemies of dried fruits are heat and humidity. The ideal temperature for storage is 10 °C. The finished product is transferred to a dry, clean glass container or paper or canvas bag. This will protect dried fruits from insects and mold. Store in a dark closet or pantry, away from heaters and sunlight.
It is not recommended to store dried fruits in the refrigerator. There they will quickly become damp. It is recommended to place a container with salt in the place where dried fruits are stored, which will protect against mold by absorbing excess moisture. The product can be stored for a year, periodically sorting and drying in the fresh air.
How to air dry pears at home
This method is very labor-intensive, but with its help it is possible to preserve the maximum of useful substances. If there is no room to lay out the fruits, they are carefully pierced with a needle and thread threaded in, and hung to dry naturally.
Either we place the fruit on a tray, baking sheet, or an inverted box, and dry it.
Before the cooking process, you should determine the location of future drying.
It must meet the following requirements:
- Must be windless and dust free;
- Access to fruits by midges, flies, mosquitoes and other insects should be limited in advance;
- Cover the strings with fruit with a layer of gauze.
The pears are ready in 3-4 days. They are removed from the threads and prepared for further storage.
Having determined that all the slices have dried evenly, they are placed in a dry container for subsequent storage. Carefully inspect the fruits: if mold is found on at least one part of the product, then all the preparations will be spoiled.
Read also: What are the antennae of the cockchafer called?
Methods for drying pears at home
Several methods are used to prepare dried fruits at home.
In the oven
For such drying, the prepared fruits are laid out on a baking sheet in one layer. The oven is preheated at 60 degrees. A baking sheet with pears is placed in it and dried for two hours. Then the temperature increases to 80 degrees. Further drying in the oven of a gas stove takes about 20 hours. If the fruits are cut coarsely or dried whole, then up to 25.
The drying process requires monitoring every half hour.
During the drying process, the weight of the product decreases significantly. The disadvantage of this method is that some of the beneficial substances in pears are destroyed during heat treatment.
In the microwave
This method is the fastest of all. In this case, a portion of fruit is dried within 5-6 minutes, but if the process is not controlled, the batch can very easily become overdried.
For such drying, you need to take a flat dish suitable for microwave ovens, arrange the pears in one layer and place them in the microwave.
To properly dry the fruits, the power is set to 200-250 W, and the oven is turned on for two and a half minutes. Then you should check the condition of the pears. They should spring back slightly when pressed.
If necessary, fruits can be dried, but not more than 2-2.5 minutes.
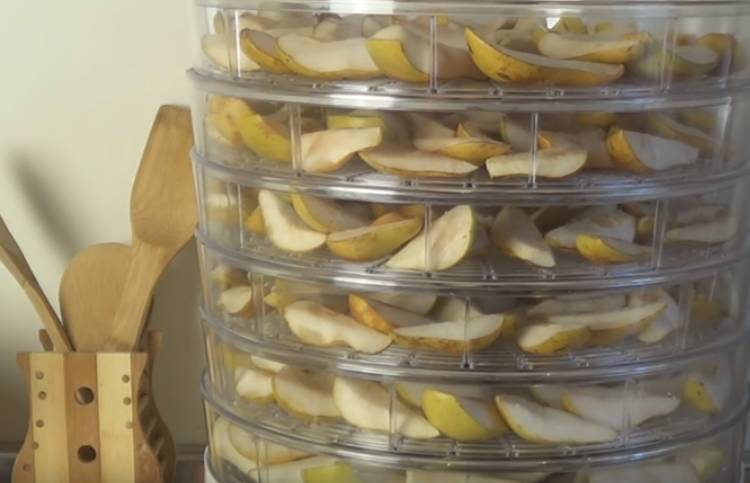
In an electric dryer
This device is designed for drying vegetables and fruits. It is assembled according to the instructions; prepared pieces of pears are placed in it. They are dried at a temperature of 70 degrees.
In an electric dryer, the treatment lasts from 15 to 19 hours. From time to time, the pear slices should be turned over to dry evenly.
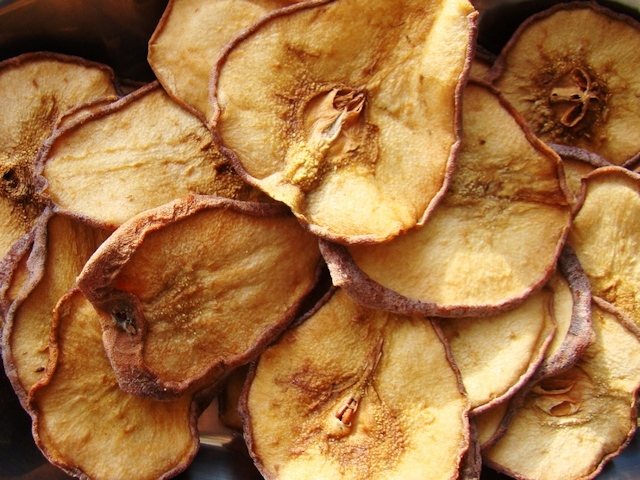
Properly dried pears do not crumble and have a pleasant light brown color. They feel elastic to the touch.
Air drying
This method is quite labor-intensive, but it preserves all the beneficial substances in the pears. You can dry fruits naturally, without laying them out, but by piercing them with a needle and thread and hanging them to dry.
First you need to choose the right place for the upcoming drying. It must meet the following requirements:
- there should be no wind or dust;
- insects (mosquitoes, flies, midges) should not have access to the slices;
- The threads with pears should be covered with gauze.
After drying for 3-4 days, the fruits are removed from the threads and placed in dry jars or containers for storage.
You should make sure that they are sufficiently dry before placing them in a dry container for storage. It is important to make sure that there is no mold on any piece, otherwise the entire batch will be spoiled during storage.
In the drying cabinet
Such devices are also designed for drying fruits, fish, meat, and mushrooms. Unlike an electric dryer, you can place a larger number of fruits for processing here, since several baking trays can be placed in it.
The drying process occurs due to the circulation of hot air in the cabinet. Baking trays with prepared fruit load the cabinet, close it and set the temperature to 70 degrees.
While drying in the cabinet, you can also periodically open it and turn the slices over. This procedure takes 12-15 hours.
Drying ovens can be used not only on an industrial scale, but also if there is a large amount of fruit from fruit trees.
In the sun
The place for this drying method must be sufficiently lit. Insects should not land on fruits.
The pears are dried in one layer on a flat dish or baking sheet. Drying is carried out during the day in the sun, in the evening they are covered with gauze and removed indoors. In this way, the fruits are processed for 3-4 days, then stored in glass containers.
Drying pears in the microwave
Using kitchen appliances, you can dry any amount of fruit in an apartment, if it is not possible to do this, for example, in the air. The cooking speed depends on the power of the microwave oven.
Only ripe fruits are suitable for drying.
Cooking process:
1. The fruits are thoroughly washed and cleaned, sorted and only suitable fruits are selected.

Cut into not too thin slices.
2. Cover a container suitable for a microwave oven with a sheet of parchment. Place the slices on the prepared surface with a slight indentation from each other.
3. Place the container with the contents in the microwave. Set the power to 300 W. Set the time to 5 minutes. If the slices are not completely dry, add another 90 seconds.
To prevent the pieces from darkening, they are kept in diluted citric acid for about 20 minutes.
How to dry pears at home: 7 ways
Dried pears are dried fruits that contain beneficial vitamins that have a beneficial effect on the entire body. The drying method plays an important role when preparing juicy fruits.
To preserve the harvest, it is necessary to use alternative harvesting methods in order to subsequently cook delicious compotes, jams and preserves and other treats.
Fruits can be dried in the sun or in the oven, the main thing is to do it correctly, so that later you can enjoy dried fruits for a whole year.

In winter, we feast on them and cook delicious compote. Add dried apples and you get a fragrant and tasty drink. The whole point is to let the drink steep, then it will release all the vitamins and you will get a rich, beautiful color.
Drying rules
Processing using this method has a number of features that need to be taken into account when preparing fruit for future use.
1. You should not choose overly juicy and overripe fruits.
2. For the blanks you will need medium-sized pears. Too large ones are not suitable for cooking.
3. Preference should be given to fruits with a small seed pod. It is better to harvest immediately, immediately after harvesting, otherwise they become too soft and are not suitable for drying.
4. Fruits should have a dense texture.
5. The taste of dried pears is adversely affected by viscosity, for this reason it is better not to use such varieties.
6. Dry slices 1 cm thick. Small fruits, such as wild game, can be prepared whole.
Fruit preparation
It is important to use quality products to preserve the delicious aroma.
Before harvesting, the fruits must be prepared appropriately.
All preparation is as follows:
- Washing and cleaning fruits;
- Thorough drying of fruits;
- Sorting of pears, rotten and overripe specimens are removed;
- The fruits are placed in a boiling liquid for 10-15 minutes, sugar is added to the liquid;
- The product is left to cool;
- The pears are cut, the seeds are removed, and the spoiled areas are cut off;
- To preserve the color, the workpieces are dipped in a solution of 1% tartaric or citric acid.
The cutting method is determined depending on the original size of the workpieces. Fruits that are not too large are chopped into slices or two parts.
Large ones are chopped into slices, not too thick in size. This way it will be possible to preserve the rich aroma and taste. For harvesting, you can take whole fruits of a much smaller size, not forgetting to remove the stalk.
How to dry pears in an electric dryer
Chopped fruits are placed in the device and cooked at a temperature of 70 degrees.
Cooking time is from 15 to 19 hours. While drying, the slices must be turned over to ensure even cooking.
Properly prepared slices do not crumble when broken. They acquire a pleasant light brown hue, as well as elasticity.
Proper drying in the sun
The product should be prepared, washed and dried, cut into thin slices. To prevent darkening, the slices are kept in 1% tartaric acid. Dip into boiling water for 2 minutes.
The blanks are evenly distributed on any plane - a piece of plywood, a board or a box. All this is exposed to the sun. A good place is on the roof of a summer cottage, provided that there is direct sunlight.
If there is no suitable place for cooking, then the slices are strung on a thread like mushrooms and hung on the sunny side. In the winter, they sometimes dry it near heating appliances.
The whole process lasts about two days. In the evening, the product is hidden indoors. Two days later, the pieces are taken off the street and left to dry in a dark place for another three days. At regular intervals they change sides.
How to air dry pears at home
This method is very labor-intensive, but with its help it is possible to preserve the maximum of useful substances. If there is no room to lay out the fruits, they are carefully pierced with a needle and thread threaded in, and hung to dry naturally.
Either we place the fruit on a tray, baking sheet, or an inverted box, and dry it.
Before the cooking process, you should determine the location of future drying.
It must meet the following requirements:
- Must be windless and dust free;
- Access to fruits by midges, flies, mosquitoes and other insects should be limited in advance;
- Cover the strings with fruit with a layer of gauze.
The pears are ready in 3-4 days. They are removed from the threads and prepared for further storage.
Having determined that all the slices have dried evenly, they are placed in a dry container for subsequent storage. Carefully inspect the fruits: if mold is found on at least one part of the product, then all the preparations will be spoiled.
Drying pears in the microwave
Using kitchen appliances, you can dry any amount of fruit in an apartment, if it is not possible to do this, for example, in the air. The cooking speed depends on the power of the microwave oven.
Only ripe fruits are suitable for drying.
Cooking process:
1. The fruits are thoroughly washed and cleaned, sorted and only suitable fruits are selected.
Cut into not too thin slices.
2. Cover a container suitable for a microwave oven with a sheet of parchment. Place the slices on the prepared surface with a slight indentation from each other.
3. Place the container with the contents in the microwave. Set the power to 300 W. Set the time to 5 minutes. If the slices are not completely dry, add another 90 seconds.
To prevent the pieces from darkening, they are kept in diluted citric acid for about 20 minutes.
How to dry pears in a gas stove oven
As in the previously described method, the slices should be placed on a baking sheet so that they do not touch each other.
You should clearly control the temperature and periodically adjust the heating down or up.
Before starting cooking, the temperature is set to 50-55 degrees. This will reduce the likelihood that the skin will crack.
After 2 hours, when the slices are slightly dry, you can increase the heating to another 80 degrees.
After the product has decreased somewhat in size, change the temperature again to 50 degrees. At this temperature, you can dry the product until it is completely ready.
The size of the pears plays an important role in calculating cooking time. For small pieces, 12-14 hours will be enough, and whole pears will need approximately 24-26 hours.
While the oven is operating, the premises should be well ventilated, since a constantly burning fire in the appliance contributes to strong heating of the air and combustion of oxygen.
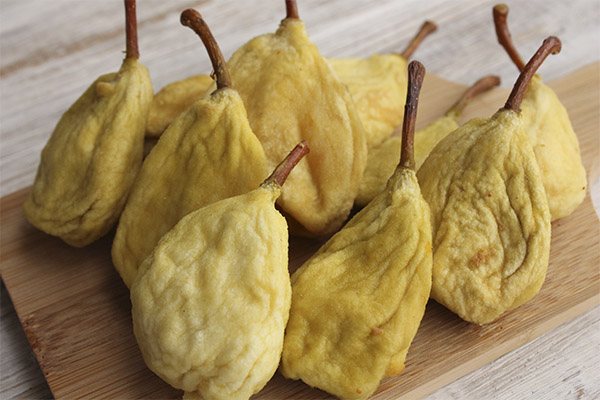
Features of drying whole pears
Cooking steps:
1. Wash ripe ones, without visible damage or black spots, trim the stalks and dry with a towel.
2. Prepare high-sided baking sheets by lining them with parchment sheets. Place the fruits on them tightly to each other.
3. Set the temperature to 90 degrees. Place a baking sheet in it and place it on the highest level. Bake for one and a half hours. Turn off the heat and leave the pieces to cool without removing them from the oven.
4. Place the finished fruits in a room with a source of fresh air and keep them in this form for several more hours. After which the cooking procedure in the oven must be repeated.
All drying stages are repeated throughout the week. The finished product must be dry and free of pulp.
5. Move all drying materials into dry, clean containers and hide them in a place with a low temperature for safekeeping.
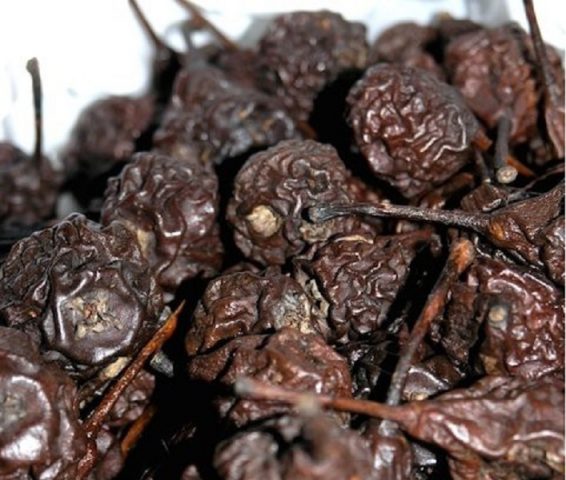
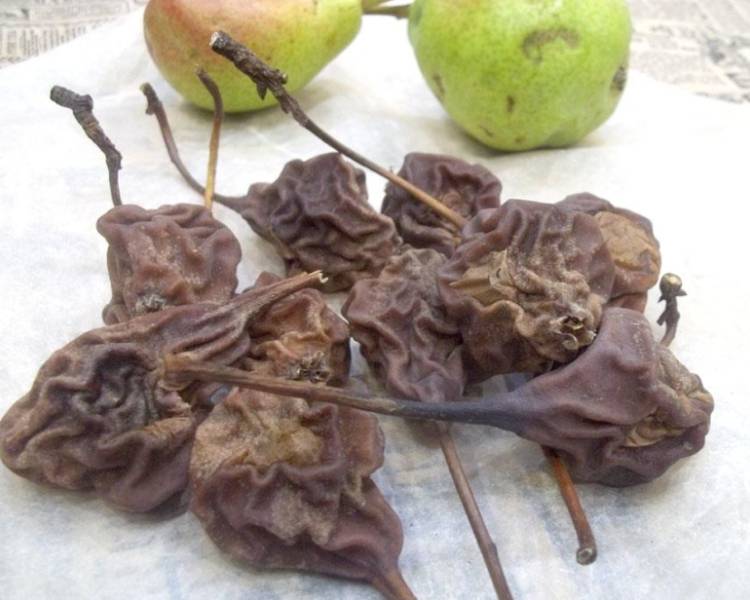
Wild pears (proper drying)
To obtain a fragrant and sweet product after drying, wild game must be properly collected and prepared for future preparations. You should not remove it from the trees, you need to wait until it naturally falls to the ground.
Then the fruits are placed in a box or bucket so that they rest and after a while turn brown.
After drying, stale and darkened wild game will become sweetish and have a rich aroma instead of a bitter and tart taste.
How to dry pears in a gas stove oven
As in the previously described method, the slices should be placed on a baking sheet so that they do not touch each other.
You should clearly control the temperature and periodically adjust the heating down or up.
Before starting cooking, the temperature is set to 50-55 degrees. This will reduce the likelihood that the skin will crack.
After 2 hours, when the slices are slightly dry, you can increase the heating to another 80 degrees.
After the product has decreased somewhat in size, change the temperature again to 50 degrees. At this temperature, you can dry the product until it is completely ready.
The size of the pears plays an important role in calculating cooking time. For small pieces, 12-14 hours will be enough, and whole pears will need approximately 24-26 hours.
While the oven is operating, the premises should be well ventilated, since a constantly burning fire in the appliance contributes to strong heating of the air and combustion of oxygen.
How to properly store dried pears
For dried fruits, including pears, a number of conditions must be created so that they do not become moldy or rotten.
First of all, you need to prepare for them not very large cotton bags, cardboard boxes with perforations so that their contents “breathe,” or glass jars with tight-fitting lids. Pour dried fruits into them and put them in a dry place where light does not penetrate. You should not place containers with dried fruits near a heating radiator, stove or gas stove, as condensation may occur, which can irreversibly damage the product.
Once every two to three weeks you need to check the condition of the dried fruits: whether mold has appeared on them, whether there are bugs or fruit moths.
If all these conditions are met, then the dried pear will last very well until the next harvest. It is not worth storing the product longer; it is better to prepare new portions of fruit.
If the pears begin to darken and become hard during storage, you can “reanimate” them. It is enough to spread the dry pieces of fruit on a baking sheet and place them in a cool oven, placing a bowl of water at the very bottom. Boiling water will release steam, on which you need to hold the product so that it becomes softer.
Some more storage tips:
- If dried pears are to be used for cosmetic purposes, then the pre-finished fruits should be crushed, sprinkled with coffee and stored in a dark, dry place;
- When dried fruits are stored for a long time, they become hard. Then before use they need to be soaked in a steam bath or briefly placed in an oven saturated with steam.
Dried pears are used in making compote or as a filling for baked goods. To make the fruit slices even richer, you can use this recipe.
Features of drying whole pears
Cooking steps:
1. Wash ripe ones, without visible damage or black spots, trim the stalks and dry with a towel.
2. Prepare high-sided baking sheets by lining them with parchment sheets. Place the fruits on them tightly to each other.
3. Set the temperature to 90 degrees. Place a baking sheet in it and place it on the highest level. Bake for one and a half hours. Turn off the heat and leave the pieces to cool without removing them from the oven.
4. Place the finished fruits in a room with a source of fresh air and keep them in this form for several more hours. After which the cooking procedure in the oven must be repeated.
All drying stages are repeated throughout the week. The finished product must be dry and free of pulp.
5. Move all drying materials into dry, clean containers and hide them in a place with a low temperature for safekeeping.
Features of drying pears for the winter
There are several simple rules, following which you will get a tasty result.
- Summer varieties of pears are better suited for drying. Late fruits, as well as fruits with an astringent taste, are not recommended to be dried.
- Select whole, slightly under-ripe fruits. They should be strong, elastic and not too juicy.
- Small or medium fruits are suitable in size. It is advisable to have as few seeds as possible.
- Do not try to dry overripe, rotten or wormy pears.
- If the fruit meets all the requirements but has minor damage, simply remove it in preparation for drying.
Wild pears (proper drying)
To obtain a fragrant and sweet product after drying, wild game must be properly collected and prepared for future preparations. You should not remove it from the trees, you need to wait until it naturally falls to the ground.
Then the fruits are placed in a box or bucket so that they rest and after a while turn brown.
After drying, stale and darkened wild game will become sweetish and have a rich aroma instead of a bitter and tart taste.

Often, uninformed people mistake such pears for spoiled ones and throw them away, but this is considered a mistake.
After selection, the game is washed and chopped into pieces, or dried entirely by any available method.
The seed nest is not removed, and the products are not blanched or fumigated.
The pliability and elasticity of the slices when bent indicates the complete readiness of the product.
When to collect wild game for drying
The trees begin to bloom at the end of April, the fruits are fully ripened at the end of the first month of autumn. During this time period they are harvested for various purposes.
Fruits can be collected by shaking, churning, or by hand, placing a cloth under the tree crown.

Falling fruits can be damaged and break on the ground, which significantly reduces their shelf life.
Next, the game is sorted, small twigs and leaves are removed, and the fruit is examined. Rotten and damaged ones are not suitable for harvesting. They taste sour and bitter. They must be left to rest.
After a while, they turn light brown and become juicy.
How to dry it properly
You will need ripe fruits that are not beaten or cracked, without black areas.
It should be noted that dark yellow game birds, as well as green ones, are not used for harvesting.
1. Rinse and dry the game.
2. Cut into 2-6 pieces, leaving the core.

3. Place in a solution of 1% citric acid for one hour.
4. Transfer the slices to boiling liquid for 2 minutes, then dip into cold liquid. This is how they blanch.
5. Dry using any of the methods.
If desired, the treatment can be carried out on the fabric under direct sunlight. Fruits are good for 2 years.
In winter, you really want to pamper your family with a real vitamin product and remind you of summer with its great abundance of fruit and berry plants. Dried fruits are great for these purposes, because they perfectly preserve useful components. The best way to prepare pears at home is to prepare them. How can this be done using an oven?
Read also: How to clear an area of overgrowth
What are the benefits of dried pears?
- When dried, pears retain the entire range of valuable nutrients found in them fresh. This includes fiber, organic acids, vitamins C, P, B1, PP, carotene, and iodine. Dried pears are strongly recommended for those people who have problems with the pancreas; decoctions are prescribed for intestinal disorders. For patients suffering from heart and vascular diseases, these dried fruits are also useful.
- To protect your family from ARVI during the cold and slushy season, you can prepare delicious, fragrant, healing decoctions from dried pears. This is a good remedy for prevention and assistance in the treatment of viral infections and colds. These drinks will be especially useful for children. They help thin mucus and thereby reduce the baby’s nighttime cough, relieve fever and relieve sore throat.
- 100 g of dried pear fruit contains a third of the daily fiber. Its fibers swell, absorbing water in the intestines, and accelerate the excretion of its contents, while simultaneously removing harmful substances and toxins, normalizing the amount of cholesterol and glucose in the blood. At the same time, the brain receives a message about satiety, causing a person to require less food. Therefore, the product is very useful for those who are on a diet and struggling with excess weight. You can take pears with you to the office as a snack, without fear of weight gain, and drink tea with them without adding sugar.
- Dried pears are also recommended for pregnant women; their benefits are due to the presence of a large amount of minerals - potassium, manganese, copper, as well as the content of folic acid, which obstetricians prescribe to all expectant mothers in the first three months of pregnancy. Folic acid is the second name for vitamin B9, and it is prescribed to prevent abnormalities in the development of the child. Pears contain more of this useful substance than even currants.
- Magnesium is useful because it allows you to block the tone of the uterus. Copper is an active participant in the formation of the baby’s cardiovascular and nervous systems, as well as his skeleton. Potassium helps normalize water-salt metabolism, due to which fluid is removed from the body more quickly and swelling, which affects many pregnant women, disappears.
- The ability of dry pears to improve the balance of fluids and salts brings relief from a hangover; it is worth preparing and drinking a couple of glasses of decoction within 2-3 hours. They will relieve nausea and soothe headaches.
- For people suffering from diabetes, dry pears are also useful because they are rich in fructose, which is absorbed without insulin, and they also improve the functioning of the pancreas.
- If fresh pears have a mild laxative effect and relieve constipation, then dried ones, on the contrary, strengthen. And all due to the fact that these dried fruits are rich in thiamine (vitamin B1) and pectin, which help fight diarrhea, for which a decoction of dried pears is prepared.
- Pear seeds stop diarrhea and, in addition, demonstrate good anthelmintic properties, proven in practice.
- Dried pears are a hypoallergenic fruit; you can safely eat it and prepare various culinary dishes from it without fear of a negative reaction, even when the situation is complicated by seasonal exacerbations of allergies.
- Whole dried fruits of the wild pear, or wild pear, benefit patients suffering from tuberculosis.
- Dry pears should also be consumed as a means of preventing possible problems with various organs and systems of the body. Thus, thanks to iron, which is a component of the chemical composition of these fruits, it is possible to prevent the development of iron deficiency anemia, improve the production of red blood cells - erythrocytes, and normalize hematopoiesis.
There are people who have an individual intolerance to pears. They, of course, should not eat the fruit.
Discomfort in the intestines awaits those who decide to experiment and drink pears with milk. And dried pear fruits harmonize well with fermented milk products, so this combination can be used in culinary dishes.
Composition and calorie content
Drying the fruit at a moderate temperature preserves all the vitamins and beneficial properties in the pear, which are sufficient in any variety. Therefore, many people who prefer to regularly consume dried fruits enjoy the taste and strengthen their body at the same time.
Compound:
- calories – 249;
- proteins – 2.3 g;
- fats – 0.6 g;
- carbohydrates – 62.6 g;
- dietary fiber – 6 g;
- water – 24 g.
Dried pear is rich in microelements, phytoncides, flavonoids, sugars, fiber, iodine, organic acids and enzymes. The chemical composition contains many vitamins, including provitamin A, C, group B, K, P, PP. The pear contains the most potassium, calcium, magnesium, phosphorus, iron, manganese and copper.
A pear may seem sweeter than an apple, but it actually contains even less sugar. The dried fruit is included in many diets due to its low energy value. It is low in protein, but quite high in carbohydrates.
However, it should be remembered that 100 g of product contains 12% of the daily calorie intake, so this should be taken into account by diabetics and people watching their figure when planning their diet.
Dried pears in medicine
Dried pear is used primarily in folk medicine. Namely:
- at high temperature;
- as a diuretic;
- as a general tonic;
- against cough
The product is used for inflammatory processes in the kidneys and bladder, to restore the acidity of gastric juice, and to suppress microbes in the intestines. And there are actually no special recipes. You just need to regularly consume the dried fruits themselves or a rich compote made from them.
People also use dried pear to treat:
- insomnia;
- obesity;
- colds and coughs;
- high cholesterol;
- fatigue;
- digestive disorders;
- depression;
- heart problems;
- nervous system disorders;
- headache.
Harm and contraindications
There are undoubtedly many benefits from dried pears, but there are also harms. Although there are not so many calories, they are a priori, so you should not abuse them by eating a lot of dried fruits every day. People with diabetes need to think especially about this.
High fiber foods should not be consumed by people with stomach ulcers. And dried pears have enough fiber.
Drying pears: technology
The quality of dried pears will largely depend on compliance with all stages of their production:
- Selection of fruits. For such purposes, it is better to choose ripe, juicy, but not watery pears. varieties with dense inclusions are well suited for drying
- "Zaporozhye";
- "Forest Beauty";
- "Limonka";
- "Victoria";
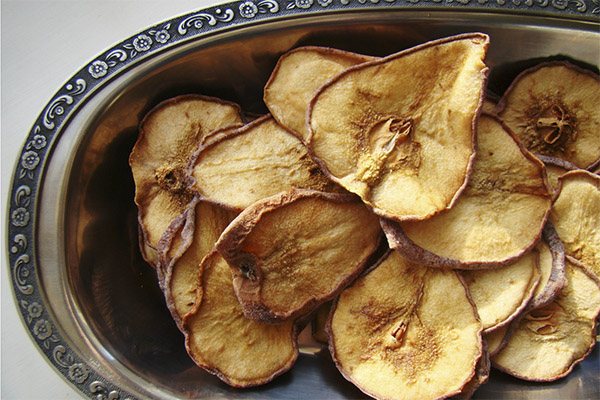
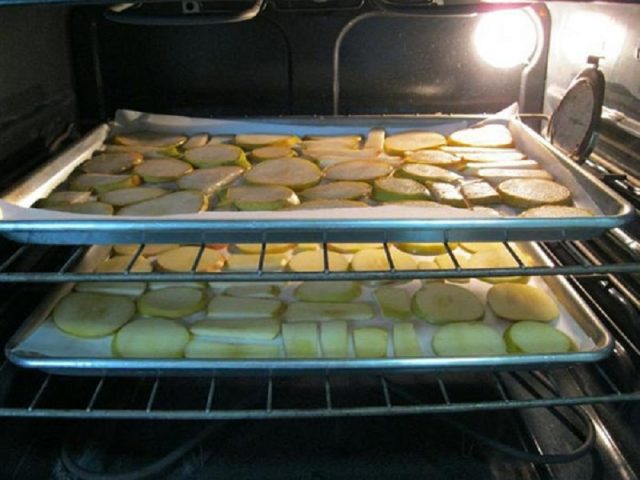
- Preparing for drying. The washed fruits should be cut into slices lengthwise, no more than 1 cm thick. The chopped fruits are placed on a baking sheet in one layer. You should first preheat the oven to 60 degrees Celsius.
- Production of dried fruits. Leave the pan in the oven for 2 hours and close the door tightly. Then increase the temperature to 80 degrees.
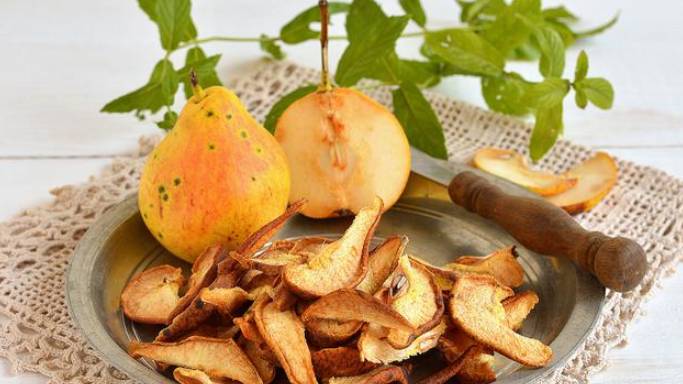
What can you cook from dried pears?
Dried pear fruits are universal, which is why they are good: they can be used both for baking or desserts, and for cooking compote; in addition, they are used to prepare meat dishes, snacks and even soups.
Dried pear dessert
You need to boil 1 liter of water with sugar. Those who don’t like very sweet things can add just a spoonful of sugar, those with a sweet tooth can add 4-5. Dip two handfuls of dried pears into the syrup, boil for 25–30 minutes, remove them with a slotted spoon and place on a plate to cool.
Take two chicken eggs and carefully separate the whites. Beat the whites with a mixer: first at low speed, then gradually increase it, carefully adding a teaspoon of sugar. When the whites turn into a thick mass, stop adding sand and start adding cocoa little by little, a teaspoon at a time - no more than a tablespoon in total. The result will be a pale brown meringue.
Thread the pears boiled in syrup onto skewers, dip them in the meringue and place in the oven preheated to 120–150 degrees. It is better to leave the door slightly open. In half an hour, the delicious dessert will be ready.
You can cook compote with the remaining syrup by adding water and adding dried apples, prunes, dried apricots, and figs.
Compote without sugar
You will need 150 g of dried fruits: 100 g of apples and 50 g of pears. Rinse the fruits and put them in cold water for half an hour, then drain the water, rinse the apples and pears and, after boiling 1 liter of water, put them there and boil for another half hour.
If you plan to give the compote to children, you can make it sweeter by adding dried banana or apricot.
Dry pear soup
Thoroughly wash 250 g of dried pears, put them in a saucepan and add 1 liter of hot water. After an hour, return the pan to the fire, add 50 g of washed rice and cook until fully cooked. Then add sugar to taste (those who don’t like sweets can do without it altogether), cinnamon and starch, which should first be diluted with cold water. Stir the contents of the pan vigorously, bring to a boil and turn off the heat.
Serve this soup with sour cream or cream. Usually sweet soup is considered a cold dish, but this one is tasty and hot.
Step-by-step instruction
So, to prepare dried pears, you should follow these instructions:
- Select suitable varieties of fruit;
- Prepare the fruits for drying;
- Directly prepare dried fruits.
Preparing pears for drying:
Nuances
Experienced housewives recommend paying attention to the following points:
- Medium-sized pears are cut in half or into four parts;
- Fruits that are too hard should first be boiled for 4-5 minutes;
- The wild pear variety can be dried whole in the oven without cutting into pieces.
They collect the “game” only when it falls to the ground on its own. Then the fruits are put in a box and left in a dark, cool place until the skin begins to darken. It is at this time that the pear will be the most juicy, aromatic and ripe and can be dried in the oven.
Electric stove
Drying pears in the oven of an electric stove is no different from cooking dried fruits in a conventional oven that runs on gas.
The only difference is that an electric stove, as a rule, has two heating systems: lower and upper. Whereas a gas stove only has heating from below. That is why it is more convenient to use an electric oven when preparing dried pears.
Pear chips:
Convection mode
Convection mode assumes that the oven is equipped with a fan, whose task is to distribute heat evenly. It is the presence of such a stove in the kitchen that will significantly save effort and nerves, because now you no longer have to worry about the fruit sticking to the surface of the baking sheet or burning.
At the same time, preparing pears for drying, and the process itself, will not differ in any way from the procedure for preparing dried fruits in a conventional oven.
How to dry pears in a gas oven
A fairly quick way to prepare dried fruit for the winter, preserving its taste.
Preparation:
- Wash the fruits thoroughly. They must be free of damage and wormholes. Dry and cut into medium-thick slices. Pour boiling water over the fruit and leave for a quarter of an hour. Drain the infusion and place the slices on a paper towel.
- Line a baking sheet with foil or parchment. Arrange the slices in one layer. Place in an oven preheated to 55°C. Dry for 2 hours. Then increase the heat to 80 °C. When the slices decrease, return the temperature to its original value. Dry the pear in the oven on a gas stove until done.
Important! When drying in the oven, ensure good ventilation of the room.
Recipes
Dried pears are used in making compote or as a filling for baked goods. To make the fruit slices even richer, you can use this recipe.
Pears dried in the oven in sugar syrup.
- We select suitable varieties of pears;
- We wash the fruits and let them dry naturally on a paper towel;
- We cut the pears depending on their size;
- Add 2-4 g of citric acid to cold water and put the fruit there for a few minutes;
- Then you should boil the pears in sugar syrup and dry them in the usual way.
The result is very tasty and sweet pears.
Desserts: dried pears for decorating the cake:
So, to prepare a real vitamin reserve for the winter, it is enough to select suitable varieties of pears, prepare them properly and dry them in the oven.
Good day everyone!
We continue to dry fruits, and today we have pears next. Dried pears are no less useful than other dried fruits.
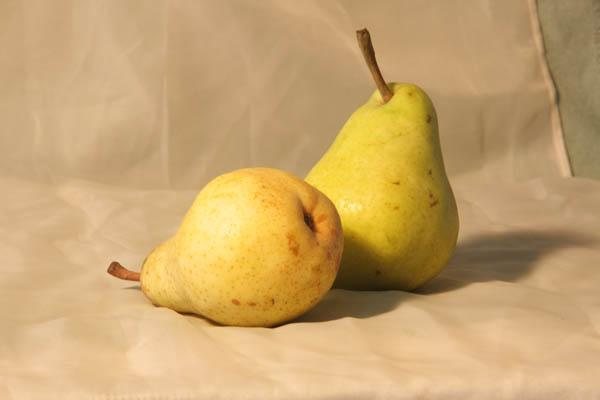
What are the best pears to use for drying? The most suitable fruits are those that are slightly unripe and not very juicy. The pulp should be dense, few seeds. Pears should taste sweet. These are either summer varieties or early autumn ones.
Varieties such as Aromatnaya, Ilyinka, Bergamot, Zaporozhskaya, Lesnaya Krasavitsa, Limonka, Victoria are suitable for this purpose.
There are several ways to dry pears. Traditionally, fruits collected at the dacha are dried in the air (in the sun) so as not to be transported to the apartment. If the weather does not allow this or you need to dry it faster, then use the oven. Now they often resort to more specialized devices, such as an electric dryer.
Read also: The usual method of sauerkraut
It’s not worth talking about what is best to use, everyone chooses for themselves.
Oven dried pears in sugar syrup
Pears dried in the oven in sugar syrup.
- We select suitable varieties of pears;
- We wash the fruits and let them dry naturally on a paper towel;
- We cut the pears depending on their size;
- Add 2-4 g of citric acid to cold water and put the fruit there for a few minutes;
- Then you should boil the pears in sugar syrup and dry them in the usual way.
The result is very tasty and sweet pears.
How to air dry pears at home
So, let's start with a simple method - drying in the sun. The pear is first washed and cut into slices. Since drying occurs naturally, the slices should be quite thin. To prevent the pear from darkening, it is recommended to soak the slices in a 1% solution of tartaric acid. Immediately before drying, the slices should be dipped in boiling water for 2 minutes.
After this, we lay out the slices in one layer on a solid base - sheets of plywood, baking sheets, boxes, etc. We put it all in the sun. A dacha roof is ideal if it receives direct sunlight.

In the absence of sufficient space where the pears can be laid out, they are strung on a string (thread), like mushrooms, and hung on the sunny side. In winter, by the way, they often dry it over radiators.
Dry in this way for 2 days. In the evening, the pears must be brought into the house. After two days, they are removed from the street and dried in a shaded place for another three days. In this case, the slices must be turned over periodically.
This process is simple, does not require technical costs, but is somewhat labor-intensive and time-consuming. If you need to do it faster, use the oven.
How to dry pears at home - recipe with step-by-step photos
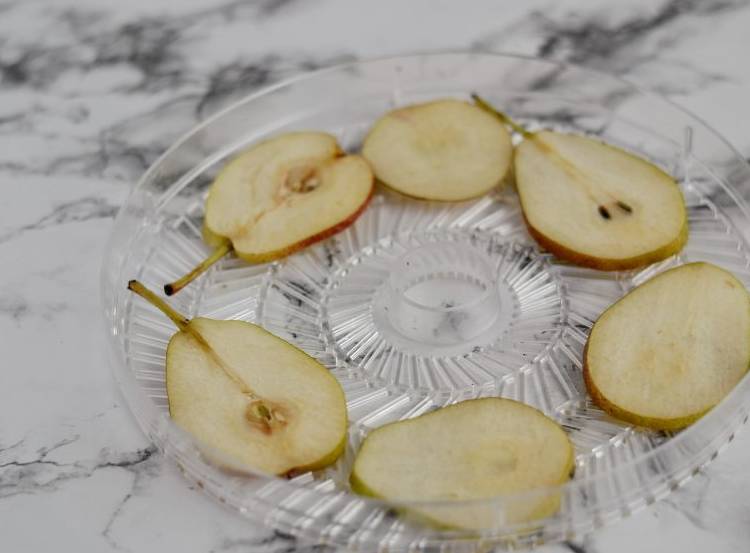
Pears – any quantity
1. Wash ripe fruits with granular pulp, wipe dry and remove the seed box with a special knife. Fruits should not be peeled. Only fruits with hard and rough skins are peeled.
If you are a supporter of a healthy diet and decide to make fruit preparations for the winter yourself, then I highly recommend buying a knife that allows you to easily remove the core from the pears themselves and similar fruits - apples and quinces.
2. Cut the fruits into thin 3 mm rings. It is convenient to store dried pears in this form, stringing them on a thread. Although you can dry pears whole, if the fruit is small in size, cut it into 2-4 parts, cut into cubes, etc. in a convenient shape.
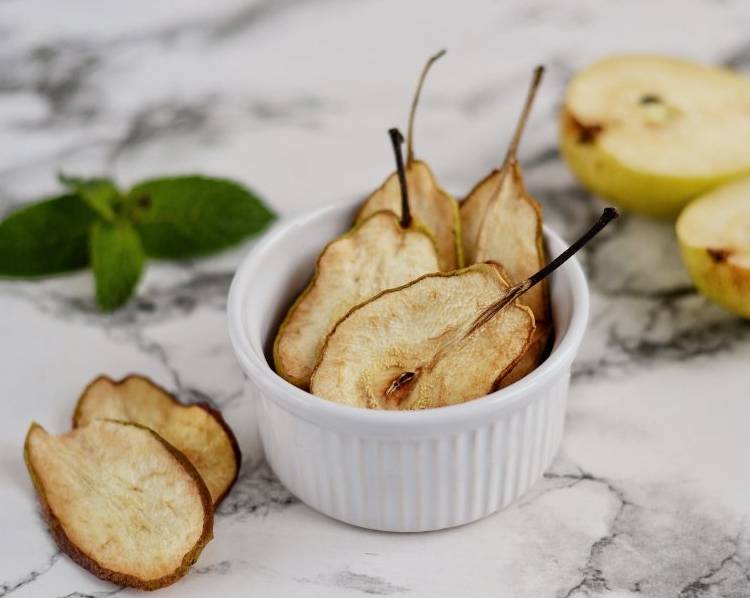
3. Place the pears on a wire rack or baking sheet in a single layer so that they do not overlap each other. Place them in a heated oven to 60 degrees. At this temperature, the pear will not crack and bubbles will form under the skin. Dry them with the door open for about 3 hours, turning them over periodically.
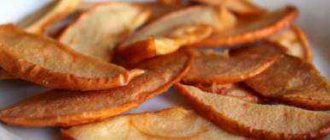
4. Finished dried pears should remain elastic and not stick to your hands and look like in the photo.
I wish everyone pleasant homemade preparations that will help us out during the long winter and vitamin-deficient spring!
- Drying pears in the sun. You can use the usual ancient method. Place the baking sheets in a hot room or in the sun. Turn the pears over periodically to dry them completely. This process may take a week. At the same time, always bring fruit indoors at night. After solar drying, the pears need to be dried in a well-ventilated area.
- How to prepare pear powder. Dried pears can be used to make pear powder. To do this, dried fruits are ground in a mill or coffee grinder. You can add 10-20% sugar or a little cinnamon to the powder. Powder is sprinkled on porridge and used for filling.
Drying pears in the oven of a gas and electric stove
Drying in the oven is a classic method when there is no other way to dry. Nowadays apartments have either gas or electric ovens. Fundamentally, the drying process in each of them is no different. The only difference is that in a gas oven it is necessary to regulate the temperature, but in an electric oven it is not necessary.
The pear is prepared in the same way: washed and cut into slices. But here, unlike street drying, you don’t have to cut it too thin. Cut as you like, either into circles or slices. Place everything on a baking sheet and into the oven.
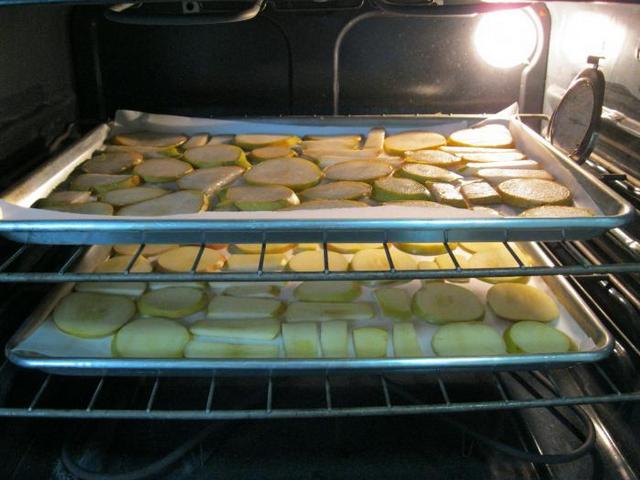
Initially, the temperature is set to 55-60 degrees. After two hours, raise it to 80°C. As soon as the slices begin to decrease in size, we lower the temperature again to 55°C. At this temperature the pear is dried until tender. If you dry in slices, it will take 16 hours, if you dry with whole fruits, then 24 hours.
Towards the end of drying, you can check for readiness. We pierce the pear with a fork, if liquid appears from it, then we dry it some more.
In an electric oven, the drying process is similar. But there is another nuance. The gas one has only bottom heating, while the electric one also has top heating, which makes drying much better and more convenient.
Drying wild pear. How to dry pears at home
Anyone can successfully make dried pear fruits at home. Usually they use slightly unripe fruits with dense pulp, but not very juicy. It is better not to use varieties with a lot of seeds that are “astringent” in the mouth. Sweet summer varieties are well suited: Ilyinka, Forest Beauty, Fragrant, Limonka, Zaporozhskaya.
Medium-sized fruits are collected, washed and boiled. Everyone does drying in their own way, but many grind the pear, first cutting it into 4 parts to remove the seeds, and then into slices. The product is then soaked in wine vinegar (1%) to avoid further darkening.
Pears should not be stored for more than 2 days before drying, otherwise they will no longer be suitable. Before drying, you need to slightly scald the fruits by throwing them in boiling water for a while. In this case, you can add sugar to the pan with boiling water if you wish.
After 10–15 minutes of cooking, remove the fruits, allow them to cool, and then, if necessary, cut them into slices. Then the slices dry. It is at this stage that it is advisable to treat them with wine vinegar.
There are several drying methods:
- natural method;
- oven;
- special electric dryer;
- microwave.
In warm regions of the country, you can dry pears in early autumn without any problems. This is especially important, because the longer the pear ripened or lay, the more useful substances accumulated in it. People living in private houses simply leave the fruits on the roof all day.
But even in cold regions it is possible to prepare dried fruits, since almost everyone has a microwave or at least an oven.
With the natural method, the slices are laid out on a sieve (tray, baking sheet) and left in the sun so that dust does not fall on them. When the sun sets, the pears are covered with plastic and taken home. After a couple of days of drying, the fruits are laid out in a shaded place for 3 days to dry, turning them over periodically.
If you have an oven, drying is done right in the kitchen. The slices are laid out on a baking sheet and dried for 2 hours at a temperature of 55–60 degrees. Next, the temperature is increased by 20 degrees. So whole fruits should dry for about a day (12–16 hours if they are slices).
There are special electric dryers with trays and autonomous operation: uniform automatic circulation of warm air. This is very convenient; you just need to put the fruits on a tray and wait for the finished result.
The fastest way to dry is in the microwave. In a few minutes the portion is ready, but there is a risk of miscalculation and drying out the product. There is no exact recipe, since it all depends on the power of the oven. You should start by drying for 2.5 minutes with a power of 200 W. If this is not enough, the process is repeated for 30 seconds. When the slices have become elastic and springy, then everything is ready.
Some people prefer to dry pears whole without dividing them into slices. The process is completely similar, the only difference is time. It makes sense to dry the whole fruit if the fruit is small in size. It will take about a week to keep whole fruits in the sun.
In the oven, whole pears will be ready in about 20 hours, turning constantly. It should be dried until the fruits turn brown. With good ventilation, dried fruits will be ready in 8–10 hours.
You can successfully dry wild pears at home. But you need to follow the rule: you cannot pick fruits from trees. You should collect the fallen pears, put them in a container (say, a bucket) and let them rest. Readiness for drying is determined by taste and color. When the fruit has become aromatically sweet and its skin is brown, it is time to make dried fruits.
How to dry pears in a convection oven
There is one more feature associated with electric ovens. Most of them have a convection mode. What does it mean? This means that this oven has a fan, which makes the drying process much more efficient by distributing heat throughout the cabinet.

Prepare the pear, cut into slices and place on a baking sheet in one layer. Place it in the preheated oven. After an hour, turn the slices over and raise the temperature to 80 °C. When the excess moisture has evaporated, the slices will shrink, set the temperature to 50 degrees and dry for two hours. In total it will take from 3 to 6 hours.
How to properly dry pears in the oven and electric dryer
In winter, it is not only pleasant, but also healthy to enjoy the wonderful taste of aromatic pears. There are many ways to preserve these fruits. One of the most popular is drying. Next we will talk about how to properly dry pears in several ways at home.
Features of drying pears for the winter
It should be remembered that this fruit processing has some features:
- Pears should not be overly juicy or overripe.
- Medium-sized fruits are dried. Too large for drying are not suitable.
- It is desirable that these be fruits of those varieties that do not contain a large number of seeds. After picking, fruits should not be stored for more than 2 days, as they become too soft and are not suitable for this storage method.
- Pears should have a firm texture.
- Viscosity has a bad effect on the taste of dried fruit, so it is better not to use viscous varieties.
- The thickness of the slices should not exceed 1 cm. Small pears, including game ones, can be dried whole.
Wild varieties can also be used, but the fruit must be ripe and fall from the tree on its own. Unripe fruits, as well as fruits that have been frozen, are not suitable for drying.
Preparing fruit for drying
Before drying, fruits should be prepared first. They do this as follows:
- remove unripe or spoiled fruits;
- wash thoroughly;
- dry with a towel or naturally;
- immerse in boiling water for 15 minutes, then pull out. If you are going to dry the game, add sugar to the water if desired.
- Allow the fruit to cool well.
After this procedure, the fruits are cut and the seeds are removed. Then cut into slices. The resulting workpiece is placed in a weak solution of citric acid.
Methods for drying pears at home
Several methods are used to prepare dried fruits at home.
In the oven
For such drying, the prepared fruits are laid out on a baking sheet in one layer. The oven is preheated at 60 degrees. A baking sheet with pears is placed in it and dried for two hours. Then the temperature increases to 80 degrees. Further drying in the oven of a gas stove takes about 20 hours. If the fruits are cut coarsely or dried whole, then up to 25.
The drying process requires monitoring every half hour.
During the drying process, the weight of the product decreases significantly. The disadvantage of this method is that some of the beneficial substances in pears are destroyed during heat treatment.
In the microwave
This method is the fastest of all. In this case, a portion of fruit is dried within 5-6 minutes, but if the process is not controlled, the batch can very easily become overdried.
For such drying, you need to take a flat dish suitable for microwave ovens, arrange the pears in one layer and place them in the microwave.
To properly dry the fruits, the power is set to 200-250 W, and the oven is turned on for two and a half minutes. Then you should check the condition of the pears. They should spring back slightly when pressed.
If necessary, fruits can be dried, but not more than 2-2.5 minutes.
In an electric dryer
This device is designed for drying vegetables and fruits. It is assembled according to the instructions; prepared pieces of pears are placed in it. They are dried at a temperature of 70 degrees.
In an electric dryer, the treatment lasts from 15 to 19 hours. From time to time, the pear slices should be turned over to dry evenly.
Properly dried pears do not crumble and have a pleasant light brown color. They feel elastic to the touch.
Air drying
This method is quite labor-intensive, but it preserves all the beneficial substances in the pears. You can dry fruits naturally, without laying them out, but by piercing them with a needle and thread and hanging them to dry.
First you need to choose the right place for the upcoming drying. It must meet the following requirements:
- there should be no wind or dust;
- insects (mosquitoes, flies, midges) should not have access to the slices;
- The threads with pears should be covered with gauze.
After drying for 3-4 days, the fruits are removed from the threads and placed in dry jars or containers for storage.
You should make sure that they are sufficiently dry before placing them in a dry container for storage. It is important to make sure that there is no mold on any piece, otherwise the entire batch will be spoiled during storage.
In the drying cabinet
Such devices are also designed for drying fruits, fish, meat, and mushrooms. Unlike an electric dryer, you can place a larger number of fruits for processing here, since several baking trays can be placed in it.
The drying process occurs due to the circulation of hot air in the cabinet. Baking trays with prepared fruit load the cabinet, close it and set the temperature to 70 degrees.
While drying in the cabinet, you can also periodically open it and turn the slices over. This procedure takes 12-15 hours.
Is it possible to dry pears in the microwave?
Of the modern kitchen appliances, the microwave is also well suited for drying. Of course, it is not directly intended for these purposes, but what our man can come up with!
Moreover, drying takes very little time compared to oven drying - only 2-3 minutes. But, there are also some subtleties here. If you do not calculate the time, the product can be overdried and it will turn into embers.

Before drying, pears are washed well and cut into slices. Take a special plate and lay out the slices in one layer. Place the plate in the microwave. We set the mode: 200 W and 2.5 minutes. After stopping the microwave, check the pears. If suddenly they are not completely dry, turn them on again for half a minute. The readiness of the product is determined by how elastic they are and do not break when bent.
That's the whole process.
How to dry pears in an electric oven
A convenient and quick way to dry pears. Dried fruits prepared in this way have an excellent aroma and taste, but during the cooking process they lose some of their beneficial substances.
Preparation:
- The baking sheet is covered with baking paper or foil.
- The pears are washed, dried and cut into not too thick slices. Place the fruits in one layer on a baking sheet.
- The oven is heated to 60 °C. After 2 hours of simmering, the heat is increased to 80 °C and dried until the slices decrease in size. Then the temperature is reduced to 55 °C and simmered until cooked. When you press on the fruit, no juice should come out of it.
- Turn over periodically to ensure the slices dry evenly. Drying pears in an electric oven will take approximately 12 hours. The baking tray should be placed on the middle level.
Video and description of how to dry pears in an electric dryer
The good thing about an electric dryer is that it is a specialized device for drying any fruit.
There is no need to regulate the temperature here, unlike in an oven. It is set to constant - 70 degrees. True, the time takes a little longer: from 15 to 20 hours. To dry the slices evenly, they still need to be turned over periodically.
To learn how to properly dry pears in an electric dryer, watch the video below.
Here are some simple drying methods. By using them, you will provide yourself with dry healthy fruits.
Why is it worth drying pears for the winter?
Pears are a fruit that is very difficult to store in a cellar or apartment for a long time. To extend their life, the fruits are preserved for the winter. However, when harvesting in this way, pears are exposed to high temperatures, which leads to a loss of beneficial properties.
Therefore, many housewives prefer to stock up on dried fruit for future use. All the benefits remain in the dried fruits. Pears are rich in vitamins, sugars, acids, minerals and fiber. The properties of the fruit are useful for people with diabetes and excess weight. This is explained by the saturation of fructose, which is absorbed without requiring insulin.
The process of preparing dried pears at home is not complicated; I suggest using the oven for this. With just a few minutes of preparation and a few hours of drying, you'll be spoiling yourself with delicious pieces of your favorite fruit all year long. Using this recipe, you can also dry pears in an electric dryer, since the technology for preparing the fruit is similar (at the end of the article you can watch a video on how to dry pears in an electric dryer).
I suggest you familiarize yourself with its intricacies, but first a few words about the use of dry pears in cooking.
Drying pears at home for the winter
Dried fruits from garden or wild pears are a storehouse of easily digestible carbohydrates, vitamins and microelements. Their peel contains a lot of useful substances necessary to maintain immunity in winter and spring. You just have to stock up on the gifts of nature, and then no diseases will be scary. The thing is that, compared to fresh ones, these dried fruits have a long shelf life and “survive” until spring without problems. The pear fruit is rich in glucose, sucrose, fiber, acids, and pectin. A large amount of vitamins B1, C, P, PP, carotene make the fruit unique. Proper drying of the pear does not allow it to lose its beneficial properties.