Do-it-yourself rowan: crafts from rowan. The best ideas with photos
Another beautiful and bright autumn craft - a DIY rowan tree will definitely captivate children and parents into the creative process. You can use natural material to create original flower arrangements, or you can make a twig with berries using your knowledge of beadwork.
In this case, how to make a rowan with your own hands , it is better to use silicone-based glue for the mosaic rather than PVA glue; it will fix the beads on the surface faster. You need to grease one element (berries or leaves) of the picture and sprinkle beads on top: for berries - red, for leaves - orange or green of your choice. Thus, you need to fill in all the elements without going beyond the outline. Each time, the beads must be pressed with your finger against the surface of the cardboard for a more secure fastening. When the glue sets, you can turn the sheet over and all the excess beads will fall off on their own, after which you need to manually fill in the empty spaces, if any.
Flowers in glycerin. We preserve the bouquet dear to our hearts for many years
How to preserve a flower given by a loved one for a long time? You can dry it naturally. But such a plant looks boring and faded. There is a way that allows you to preserve the flower almost in its original form. This method is preserving the plant in glycerin. As a result of this procedure, you get a beautiful and original composition in the form of a glass container, inside of which there are bright and delicate flowers, leaves or whole twigs.
Our article is dedicated to all those who want to learn how to make such products. It tells in detail how to make flowers in glycerin with your own hands. Get acquainted with the information presented and take it into account.
Preserved flowers in glycerin. Description of the manufacturing process
To work you will need:
- technical glycerin;
- water;
- glass container with a wide neck;
- plants.
How to make flowers in glycerin with your own hands? Follow the instructions. Place the plants in a glass jar. They must be clean and dry. In a separate bowl, mix warm water and glycerin in a ratio of 1: 1.5. Pour this solution into the container where the plant is already lying. Close the jar with a lid. That's it, the flowers are preserved in glycerin. They will maintain a fresh and bright look for a long time. Some plants may change slightly in color, but this will not affect the quality of the product. The container can be decorated to your liking: tie it with ribbon or braid, glue a decorative butterfly or artificial flower to the lid.
Flowers in glycerin: processing large plants
Whole branches with leaves, flowers and fruits can be preserved almost in their natural form for a long time. To do this, they need to be treated with glycerin. Let's talk about this in more detail.
The twig is washed in running water, dry and damaged leaves and flowers are removed. The plant is dried. The ends of thick stems need to be broken with a hammer. Thin branches can simply be cut with a knife. A solution is prepared from technical glycerin (1 part) and very hot, almost boiling water (2-3 parts) in a deep and wide vessel. The branches are placed in it so that they are completely covered with liquid by 10 centimeters. Cover the vessel with plastic wrap. In this state, the plants are left in glycerin for 15-20 days. During this time, the twigs, foliage and flowers dry out, but at the same time they remain almost natural color and texture.
After processing, the flowers are placed in a vase, and they are stored in this form for several years. Also, ikebana and various compositions can be made from plants dried in this way.
Now you know how to dry and preserve flowers in glycerin, and you can preserve a bouquet dear to your heart for many years.
Flowers in glycerin: processing large plants
Do-it-yourself rowan
By the way, many needlewomen forget that you can make original jewelry from natural materials, for example, do-it-yourself rowan beads , which are perfect for a themed autumn photo shoot. Many creative brides add such elements to their hand-made wedding bouquet, and it looks more refined and delicate than those for which ordinary fresh roses are used.
If you decide to make crafts from rowan with your own hands, you can find photo ideas on the Internet, and the first thing you will stumble upon on the vastness of the global web is a beaded tree. Its craftswomen perform it in two versions: autumn - with yellowed leaves, winter - with a “snow” cap over the bunches.
DIY paper rowan
Naturally, if we are talking about do-it-yourself rowan berries , then we must not forget about the most accessible material for creativity - this is, of course, paper. The quilling technique allows you to create bright, voluminous floral paintings and cards using only paper strips and glue.
Ready-made strips can be bought in stores, along with other art supplies; you can also cut them out yourself by first drawing a sheet of red and green paper into strips with a pencil. The width of one strip can be 5-7 mm.
There is another available material from which you can make, for example, tulips from candies - this is corrugated paper. Children like to work with corrugated paper because it easily glues, cuts and creases. And a DIY rowan tree made from paper will fill your home with bright colors and will lift your spirits on cold, rainy autumn evenings.
Chestnut tree
It is believed that such a craft is not only a wonderful and original gift. She is able to bring happiness into the home. To decorate the tree, you can use any decorative elements and use your imagination as much as possible.
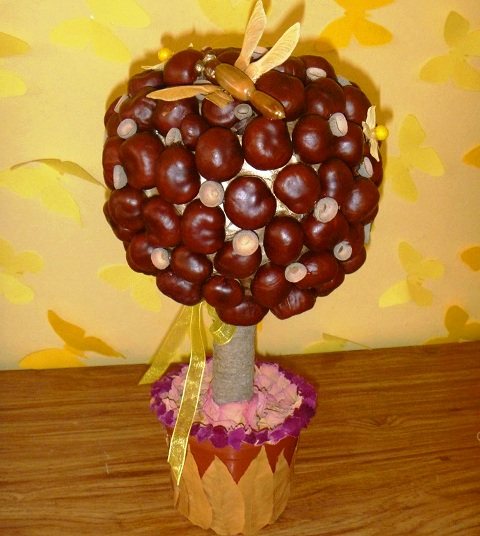
The following materials and equipment will be required:
- chestnuts (they should be dried a little);
- corrugated paper;
- oak acorns;
- regular newspaper;
- threads;
- scotch;
- a beautiful and durable stick (it will serve as a trunk);
- glue;
- heat gun.
The manufacturing process will look like this.
- We make a dense ball from newspaper that will serve as the crown of the tree.
- We wrap the newspaper with tape or tie it tightly with thread, thereby fixing the spherical shape.
- We attach the resulting “crown” to the trunk with tape.
- Using a heat gun, we begin to attach the chestnuts to the crown (you should start from the trunk and gradually move towards the top).
- We hide the voids formed between the chestnuts with the help of acorns.
- The remaining voids can also be filled with corrugated paper, gluing it with regular glue.
Depending on your desire, the resulting product is decorated with additional decorative elements and placed in a beautiful pot.
How to dry rowan
Photo © Regina Lipnyagova
A lot has been said about the beneficial properties of red rowan more than once. But the fruiting period of this berry is not the longest, so you need to know how to preserve all the beneficial properties for the maximum period. It is most optimal to dry rowan, and then prepare healthy drinks from it all winter.
You can dry rowan in different ways. It dries well in the open air; you can also use an electric dryer, oven, or even a microwave for this. Rowan berries should be dried in the open air either in clusters upside down in a well-ventilated place, or scattered in one layer on a tray or fine wire rack.
We offer you detailed step-by-step instructions with photos on how to properly dry rowan at home.
Step-by-step instructions on how to dry rowan:
To dry rowan, we need the berries themselves and paper napkins.
Spread a paper napkin.
Place clean rowan berries in one layer.
Cover with a napkin and microwave at 400 W for 10-12 minutes.
Dried rowan is ready.
To dry rowan berries in the oven, you need to scatter the berries in one layer on a baking sheet lined with baking paper. Place in the oven at 40-50°C for 50 minutes, then increase the temperature to 70°C and dry with the door ajar for 16-20 hours.
With the second option, if you use a dryer, then everything is very simple. Just follow the instructions that come with it.
How to store natural materials for crafts
Autumn natural materials are excellent preparations for children's crafts. How to store collected supplies?
The best option is to store in breathable cardboard or wooden boxes and fabric bags.
For such fragile natural gifts as dried leaves, flowers, straw, grass, paper candy boxes are perfect. The lid can be beautifully decorated and you can sign what is inside.
To store seeds, seeds, grains, and nut shells, you can use linen bags, matchboxes, and wooden chests of drawers.
After collection, the cones can be dried at low temperature in the oven. The most convenient way to store pine cones is in shoe boxes.
Chestnuts, acorns, rowan berries, rose hips are best stored in a cool place.
But plastic containers are best suited for storing shells and stones.
Sorting finds can be turned into an educational game by inviting the child to sort natural materials according to the following characteristics:
- By type - cones in one box, chestnuts in another, birch leaves in one box, maple leaves in another.
- By size - large in one direction, small in the other, and also lay out the sequence - from smallest to largest.
- By weight - light and heavy, and objects of the same type (stones, for example) can be weighed on scales. By the way, a fun activity is to weigh in a bucket suspended on an elastic band.
- By color, and with older children also by shades.
- By density - soft or hard.
- Shape - round, oval, triangular, etc.
- Texture: smooth, rough (you can even do it with your eyes closed).
If you have any tricks of your own on how to store natural materials, share them in the comments.
To receive new articles, subscribe to RSS
www.blog.stoidey.com
How to dry rowan berries at home.
Red rowan is usually dried in two ways - natural (indoors) and forced (in an electric dryer or oven).
When choosing the first option, remember that the room in which the red rowan will dry should be well ventilated.
With the second option, if you use a dryer, then everything is very simple. Just follow the instructions that come with it.
If you decide to dry the berries in the oven, then when drying you need to set the temperature from 40 to 60 degrees and monitor the uniformity of drying, constantly stirring the rowan fruits. Drying needs to be done in several stages. After 5-6 hours in the oven, the berries need to be allowed to cool for 12-20 hours. Then, if necessary, continue drying in the oven again, lowering the temperature by 5-10 degrees each time.
It is good to store dried red rowan berries in fabric bags, jars or boxes. From such a simple preparation for the winter you can make healthy desserts, brew tea, add to compotes or decoctions. Thus, knowing how to dry correctly, you can benefit from red rowan berries all year round.
Use the rosehip as a spout, and the mouth, of course, is made from red rowan berries using the same method as earrings, you just need to string them on a wire, and then lay them out in the correct shape and fasten them on a head of cabbage. Decorate your autumn with beads made from rowan berries. These DIY autumn crafts are suitable for any children's creativity competition; moreover, they are very easy and every child can do them.
Autumn gives people a lot of material for creativity - these are a variety of vegetables that can be collected in your garden, and colorful leaves flying from tree branches, as well as cones, chestnuts, seeds, wild berries, which are traditionally used to make autumn crafts .
So, for example, from an ordinary head of cabbage you can make a symbol of autumn or even autumn itself; all that is required for this is the gifts of this wonderful time of year, such as the berries of red and chokeberry, rose hips, pumpkin seeds, watermelon, melon, ash. Also prepare additional materials that you may need to achieve the desired result, such as toothpicks, thin copper wire, plasticine, colored paper and acrylic paints.
Use the rosehip as a spout, and the mouth, of course, is made from red rowan berries using the same method as earrings, you just need to string them on a wire, and then lay them out in the correct shape and secure them to a head of cabbage. Decorate your autumn with beads made from rowan berries. These DIY autumn crafts are suitable for any children's creativity competition; moreover, they are very easy and every child can do them.
Replacing a herbarium: preserving your favorite plants
Green and flowering plants, harmoniously integrated into the interior of the room, create additional comfort and decorate the house. But they also require care, for which it is sometimes impossible to allocate time. And your favorite flowers do not last long, but you want to contemplate their fragile natural beauty for a long time. Various methods of plant conservation have been developed to preserve plants almost in their natural form.
Stabilization of plants in a viscous glycerin solution helps preserve flowers, bush branches and tree shoots in their original form for a long period. At the same time, visual freshness is not lost, they are durable and elastic, the leaves have an oily sheen. Stabilized plants are used in compositions with dried flowers, leaves of tree crops, and herbaceous plants. Such plants are stored for 2 to 3 years.
Plant stabilization technology consists of replacing biological, nutritious juices that nourish the entire flora with synthetic hygroscopic alcohol - glycerin. The required composition is prepared in the following proportions: 1 part glycerin to 2-3 hot water. Preservation of plant material such as leaves, stems and twigs with leaves is carried out by immersing them in the prepared solution and keeping it in it for 2 to 3 weeks. The longer the material remains in the solution, the more intense its color will be.
Plants with a fleshy internal structure, such as horse sorrel, oak, plantain inflorescences, marsh iris, lingonberry, magnolia, rush grass and cattail, are especially successfully stabilized. But it is worth considering that too young foliage cannot be preserved with a glycerin solution.
Tree branches are cut off in early autumn for stabilization; after removing bad leaves, they are washed and the end is trimmed under water with an oblique cut. If the branch is thick enough, then its end must be broken for better penetration of the glycerin solution. Upon completion of all manipulations, the branches are completely immersed in the solution, prepared in the following proportions: 1 part glycerin to three parts water, brought to a boil. The top of the plant material must be covered with a plastic bag or film to reduce evaporation. The branches are kept in the solution for a month, while liquid must be regularly added to the original volume and the end of the cut must be renewed at intervals of 3 to 5 days, removing 1 to 2 cm each time. The stabilization process is considered complete when the leaves of the plant acquire a rich, oily sheen. For stabilization in glycerin, branches of rowan, hawthorn, barberry, oak, juniper, and blackberry are suitable.
Unfortunately, not all plant crops retain their original color after stabilization. For example, eucalyptus leaves turn greenish-brown, beech leaves turn black, and sweet olives, magnolias and medlars turn brown. Before stabilization, a crop such as rush grass is wiped with a cloth and wrapped in a tube in newspaper.
When using this type of plant stabilization, such as oven drying, it is necessary to constantly monitor the process. Plant material (flowers, leaves, berries, fruits) is laid out on a baking sheet and dehydration (drying) is carried out in the oven without closing the door at medium temperature. Drying time depends on the volume, density and type of plant material.
A new method of dehydrating in the microwave takes just a few seconds, while perfectly preserving the color of the plants. Unfortunately, there are no clear rules for this method yet - the home technological process is carried out at the experimental level. Microwave drying using the open method works well for herbaceous crops with small, numerous flowers - goldenrod, lavender, mantle, gypsophila. To do this, place the flowers on filter paper or baking parchment, folded in layers, and dry at medium power for up to 3 minutes. Then the plants are pulled out and hung to air dry for another two days.
DIY crafts from rowan. Autumn mood
Joint creativity brings parents and children closer together, awakens the imagination of both children and older children, so DIY rowan crafts will be an interesting experience for a child and will diversify family leisure time.
The child will not only learn how to make various cute things under the guidance of mom and dad, but will also receive positive emotions from contact with natural materials. Creativity develops perseverance, attentiveness, and motor skills. In addition, natural materials are environmentally friendly, which is important for many parents these days.
First of all, you will have to take care of preparing the material. The end of August, the beginning of September is the best time to collect rowan, since it is during this period that the berries become firm and their color acquires rich shades. Don’t be lazy - it’s better to harvest more, because the child should have a lot of material for creativity. In addition, a walk in the fresh air will be beneficial for the whole family.
The collected berries must be cleared of twigs, leaves and cuttings. The material is ready and now you can start making crafts from rowan with your own hands. If you also want to use rowan leaves, then you should choose those that have not yet dried out and are flexible enough. Such leaves can be easily dried under pressure or among the pages of books, and they can also be used to form various three-dimensional structural elements for crafts.
Rowan beads
The little princess will surely love beautiful beads. To do this, in addition to the rowan fruits, you will need a strong thread. When the berries dry out, the thread will become visible, so it is better to take a red one so that it does not catch the eye. The thread should be long enough - you can always cut off the excess, but if the length is not enough, you will have to tie more pieces, which will not look too neat.
The berries are strung along the cutting, being careful not to damage the berries. Working with a needle is a delicate thing; a small child should not be trusted with it. Let the girl help her mother by giving her “beads.” But an older girl can try to collect part of the beads herself.
After a few days, the berries will dry out and gaps will appear between them. To make them smaller, you need to slightly tighten the beads. This rowan decoration can become an original accessory to a costume at a children's party. Probably, in the future the girl will have a desire to make a rowan necklace for dolls.
Autumn topiary
Another great idea for making crafts from rowan berries with your own hands is topiary, or in other words, the Tree of Happiness. This product is suitable for a children's crafts competition in kindergarten or elementary school. Here you will need a variety of materials that are easy to find while walking through an autumn park or forest:
The child will not only breathe in the fresh autumn air, but will also discover an unimaginable palette of autumn colors.
It is necessary to prepare a pot where the tree will be installed and a glue gun. To begin with, take leaves of the same color, fold them like an accordion and distribute them around a small branch of rowan. Thus, bunches are formed - the basis for the future crown. Leaves of other colors can be inserted into the bunches to give the tree an interesting look. Each bundle must be secured at the base with thread. When there are about 7 or 8 such elements, you can move on to the next stage.
An unnecessary glass will serve as a pot under the Tree of Happiness. There are many ways to decorate, you just need to put in a little effort and use your imagination. As an option, the glass is carefully covered with colored cloth and decorated with rowan leaves and berries. A sheet of paper or newspaper needs to be crumpled, coated with glue and placed in a glass. The paper should lie tightly inside and occupy about half the volume.
Use scissors or a knife to make a hole in the center. A small stick is used as the trunk of the tree. The more intricate the shape, the more interesting it is. You can even make two barrels. Coat one end of the stick with glue and insert it into the hole. However, there was an empty space left in the glass. It can be filled with acorns and cones, which are also lightly coated with glue on one side so that they do not fall out of the stand in the future.
The next stage is making the crown. Roll a ball out of paper or newspaper, and secure the shape with threads. A hole is cut in the ball, smeared with glue and placed on the top of the tree trunk. For convenience, it is better to sharpen the end of the barrel. After the glue has dried, the paper ball must be decorated with previously prepared bunches of leaves. They are glued evenly over the entire surface of the ball, trying to fill the entire space. When the tree is ready, you can spray it with varnish, then the berries and acorns will become shiny. The child will be happy to see the bright, beautiful result of joint creativity.
Multi-colored garland
Bright autumn crafts - garlands can also be made from rowan berries with your child's own hands. To do this, you need to prepare threads of different lengths, multi-colored paper confetti, and also make several maple leaves or flowers using the origami technique.
There are a lot of pieces of colored paper left over from children's crafts. This is also suitable for making confetti. Using a hole punch, the task is completed very quickly. Then the berries mixed with confetti need to be strung on threads. However, threading each circle on a needle is a tedious and time-consuming task. The process will become much easier and faster if you pour confetti onto a computer mouse pad and prick the pieces of paper with a needle. At the same time, you must not forget to alternate them with rowan berries.
When the threads are ready, paper flowers or maple leaves are attached to the ends. The garland can be hung in a doorway or decorated with a window. The threads can be placed not only vertically, but also hung in arcs on the wall.
If you wish, you can come up with many more crafts using rowan berries. Surely, during the creative process, the child himself will think out the details and make his own additions.
For the first method of drying chokeberry berries, we need to dry the berries for a relatively short period of time. It will take time from picking the berries until spring. In this case, the berries are cut directly from the tree using scissors and they are cut out with a single branch (it looks like an umbrella).
LiveInternetLiveInternet
Friday, June 12, 2020 10:41 + to quote book
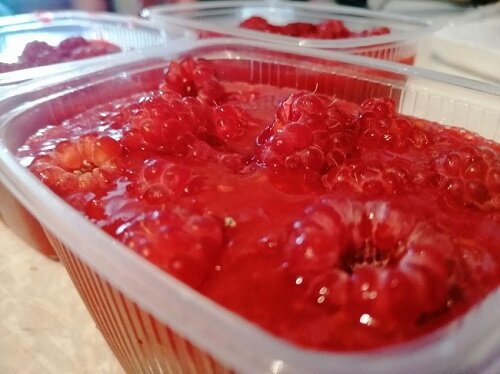
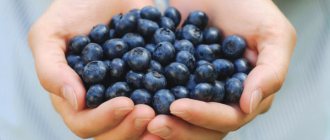
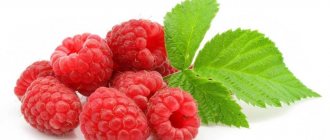
I think on the eve of the season, this method will be useful to many housewives. In this way, you can harvest any berries - raspberries, strawberries, currants, wild berries and even apricots.
Plastic containers will also be needed. They are quite inexpensive. The natural taste, vitamins and benefits are preserved as much as possible. And cooking is easier than making boring jam, adding lots and lots of sugar. I have been preparing berries this way for several years now. My children don’t even eat jam, but only eat berries this way in winter. All you need is a blender; if you don’t have a blender, the process becomes more complicated.
How I prepare berries for the winter
First, the berries need to be washed well and the stalks removed.
Now you need to sort out the berries, those that look better in one direction, those that look a little worse in the other.
There are no strict proportions; I do everything, as they say, according to the dictates of my heart.
Place good berries in prepared containers (special ones for storing food).
Not tightly, but 10 - 12 pieces each. It all depends on the size of the container.
The remaining berries need to be ground in a blender. If you like sweets, you can add sugar.
I don’t really like sweets, so I make them without sugar. Moreover, it turns out much healthier this way.
Now you need to pour the resulting ground mass over the berries in containers.
Close the lid. Place in the freezer.
All! It turns out very, very tasty. Amazingly refreshing. The taste and aroma are preserved as much as possible.
Try to preserve the harvest this year in this way, and you will see that I am right.
It's not only simple, but also incredibly delicious!!!
Source: zen.yandex.ru/domokhoz
R.S: I agree - plastic is not advisable. You can use glass containers. But...one thing. Without sugar, berries lose color and become very sour during freezing and storage. Checked!
I do this: I crush the strawberries, raspberries, strawberries a little with an ordinary metal potato masher, I always add sugar in the amount of 1/3 of the mass of the berries.
I make confiture from blueberries and currants . I pass the berries through a meat grinder or blender with the same amount of sugar. Why do I grind it finely? The skin in them is rough if you just mash it in the end. It’s delicious to freeze apricots with sugar, but you need to take very ripe or overripe fruits, cut them in half and remove the pit.
Black currant berries 500 gr.
Sugar 250 gr.
Water 80 ml.
Starch 1 tbsp.
IN WINTER THE BERRY IS LIKE FRESH!!!
Your LYUBASHA BODIA
| Categories: | = PREPARATION FOR WINTER =/From fruits and berries = PREPARATION FOR WINTER =/Frozen |
Cited 20 times Liked by: 11 users
Like share
0
Like
- 11
I liked the post - Quoted
- 0
Saved
- Add to quote book
- 0
Save to links
Liked11
0